Do you know what Directx Diagnostic Tool is? How to run the Directx Diagnostic Tool in Windows 10? If you want to learn more information about the Directx Diagnostic Tool, you can check out this post from MiniTool.
What Is DirectX Diagnostic Tool
Before I introduce you what DirectX Diagnostic Tool is, you should know some information about DirectX. DirectX is a collection of application programming interfaces (APIs) used in Windows for multimedia applications such as 3D games and HD videos. DirectX is very important if you want to play some advanced games on your computer.
Well, what is DirectX Diagnostic Tool? DirectX Diagnostic Tool, also as known as DxDiag, is a diagnostics tool used to test DirectX functionality and troubleshoot problems related to audio, display, video and other multimedia applications.
If you encounter problems when using audio and video players or running 3D applications on your Windows 10 PC, you can run DirectX Diagnostic Tool Windows 10.
The first version of the DirectX Diagnostic Tool was included in Windows 95. Nowadays the recent version of DirectX Diagnostic Tool in Windows 10 is DirectX 12.
DirectX Diagnostic Tool enables you to perform basic diagnostic tests on the DirectX system. If you don’t know how to run the DirectX Diagnostic Tool in Windows 10, you can follow the steps below to run the tool and perform a DirectX test in Windows 10.
How to Run the DirectX Diagnostic Tool in Windows 10
Here is the method for you to access the DirectX Diagnostic Tool in Windows.
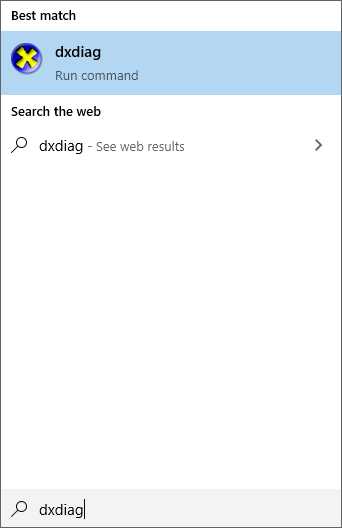
Step 1. Press Windows + S keys on the keyboard to bring up the Windows search box.
Step 2. Type dxdiag in the search box on desktop and then click the best match to run the DirectX Diagnostic Tool.
Besides the Windows search box, you can access DirectX Diagnostic Tool in Windows 10 via the following three methods:
- Press Windows+R keys to bring up the Run dialog box, then type dxdiag and tap OK.
- Open Windows PowerShell via the Start Menu, then input dxdiag and hit Enter.
- Access Command Prompt Windows 10, then input dxdiag.exe and hit Enter.
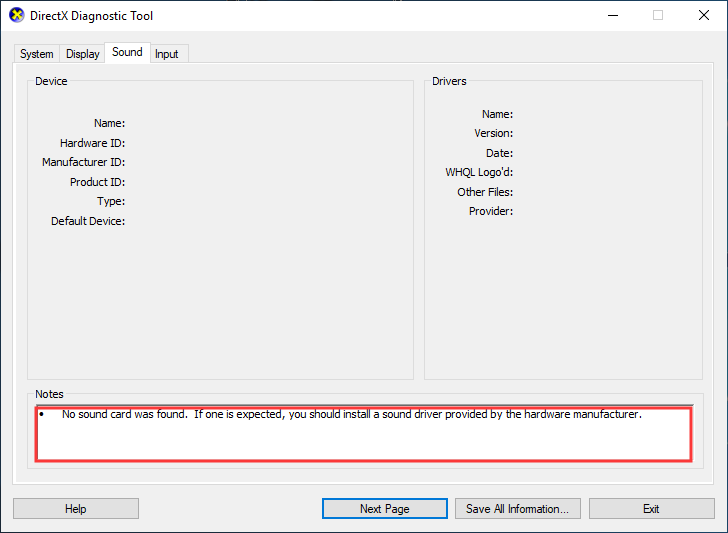
Step 3. After launching the tool, it will scan your system for problems. When it is finished, you can get the following screenshots.
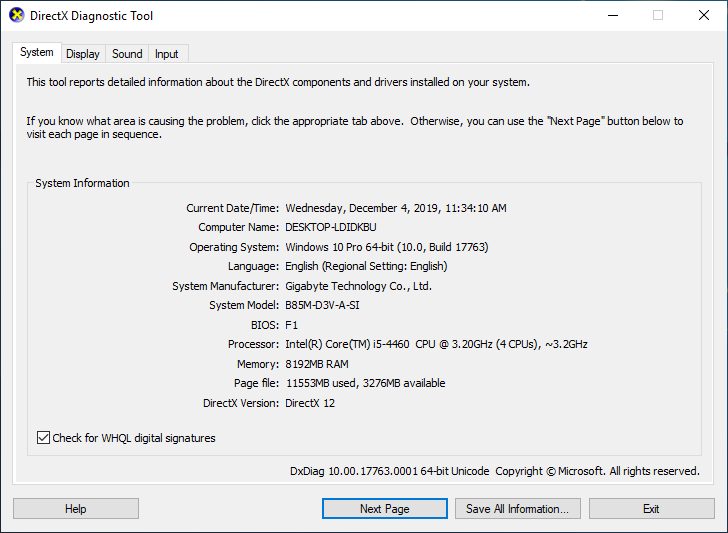
Step 4. You can click System, Display, Sound and Input tabs respectively to check if there is any problem found. You can check the Notes box for detailed information. You can also click the Save All Information… button to save the diagnostic report on your PC so you can share it with others for troubleshooting.
DirectX Diagnostic Tool is designed to help you troubleshoot various hardware problems on your computer. If you have problems with devices and drivers related to the multimedia and video on your PC, you can follow this guide to run DirectX Diagnostic Tool.
Conclusion
After reading this post, you should know what Directx diagnostic tool is and how to run the Directx diagnostic tool in Windows 10. If you have other opinions about the Directx Diagnostic Tool, you can share it with us by leaving a comment in the following comment zone.
User Comments :