If open a document of Microsoft Word, Excel, or PowerPoint that is created in previous version, you will see the compatibility mode behind the name of the document in the title bar. MiniTool will focus on compatibility mode in this post.
What Is Compatibility Mode
The compatibility mode refers to a software mechanism where software emulates the previous version of software, or mimics another operating system to allow previous or incompatible software or files to keep compatible with the new hardware or software of your computer.
Software like operating system and Internet Explorer utilize compatibility mode. With this mode, software in your computer can run properly like it runs in an older version of Windows. Some software programs are built for certain version of Windows.
If so, you are required to use compatibility mode if you want to utilize the programs to other Windows versions. Otherwise, you cannot run the software and suffer from various of errors related to the programs.
You may like this: Steps to Check If Windows 7 Apps Compatible with Windows 10
How to set compatibility mode in Windows 10? Detailed steps are offered to you in the next section.
How to Set Compatibility Mode in Windows 10
Compatibility mode is not available for all software programs. If you cannot see the compatibility mode option on your software program, it indicates that it’s unavailable and may only run on the current Windows version.
You can set Windows 10 compatibility mode with the following steps.
Step 1: After finding the executable file or shortcut file of the software program, right click click on the file and choose the Properties option from the pop-up menu.
Step 2: In the Properties window, click on Compatibility.
Step 3: Under the Compatibility mode part, check the Run this program in compatibility mode for box to go on.
Step 4: Choose the version of Windows to run the software program from the drop-down checkbox.
Step 5: Finally, click on OK button to save the change and exit the operation.
You may also like this: Windows 10 Compatibility Check – Test System, Software & Driver
How to change compatibility mode in Windows 10? To make changes to Windows 10 compatibility mode, you can change settings under the Compatibility tab. For instance, you can choose the Disable fullscreen optimizations, or the Run this program as an administrator, or other options based on your demand.
After that, you also need to click on the OK button to save the changes made to the compatibility mode and exit the current operation.
How to Fix Issues with Compatibility Mode in Windows 10
If there are any issues with the compatibility mode, you can use the Windows built-in utility – Program Compatibility Troubleshooter to fix them. Here are steps for that.
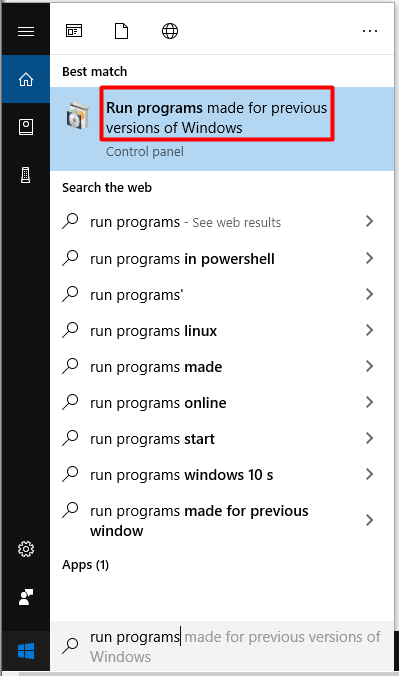
Step 1: Enter run programs in the search box, and then choose Run programs made for previous version of Windows from the given options.
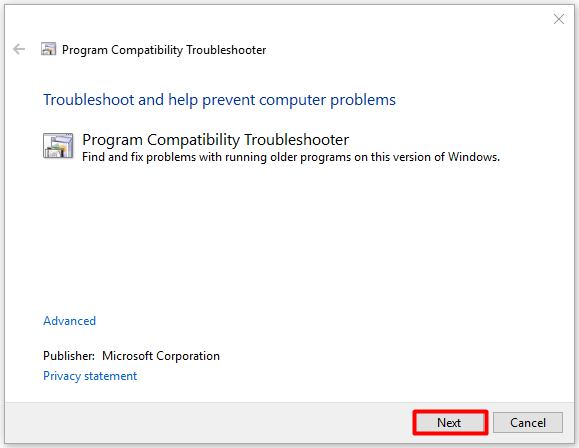
Step 2: In the next window, click on Next to go on.
Step 3: Choose the app that existing the issues in the pop-up window, and then click on Next.
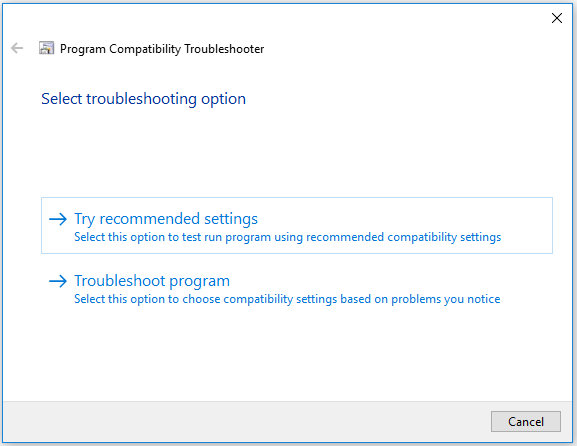
Step 4: In the Program Compatibility Troubleshooter window, select Try recommended settings or Troubleshoot program according to your demand.
Step 5: Then, follow the on-screen instruction to finish the operation.
Now, all the contents of Windows compatibility mode including the definition, opening & changing, and its error fixes have been introduced. You can use it more smoothly after reading the post.
User Comments :