Recycle Bin is a daily but easily overlooked tool for Windows 10 users. It can be a great assistant for you to manage the deleted files. In this article, MiniTool will guide you to change Recycle Bin storage settings to have better experience while using it.
About Recycle Bin
Recycle Bin, designed to store deleted files, is a great helpful tool available on your desktop. You can delete files and put them into Recycle Bin, instead of erasing these files from the hard drive immediately. With this feature, you can delete files without worries as you can restore these deleted files simply by dragging them out from your Recycle Bin.
However, Recycle Bin Windows 10 cannot keep all your deleted files forever because it has limited storage space. In fact, the Recycle Bin size can be up to 15 percent of the involved partition size.
When it is full, the oldest deleted files will be erased to spare room to accommodate your new deletions. And you might need to make much more efforts to recover these permanently deleted files when needed.
Fortunately, you can change some Recycle Bin settings to avoid this condition. In the following contents, I will show you how to do it.
#1. Adjust Recycle Bin Maximum Storage Size
To increase the number of files that can be stored in Recycle Bin Windows 10, you can change Recycle Bin storage settings directly to adjust the maximum storage size. Here are the instructions you can follow.
Step 1: On your desktop, right-click Recycle Bin shortcut icon.
Step 2: Choose Properties from the context menu.
Step 3: When you get the following window, select the Recycle Bin Location you want to configure. Then, check Custom size option and specify the Maximum size of Recycle Bin in MB according to your needs.
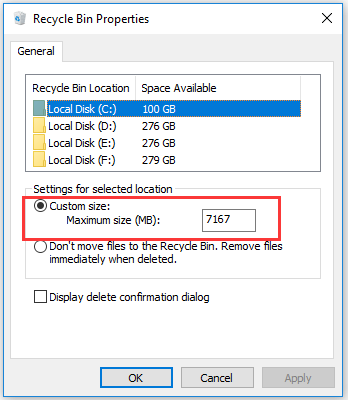
Step 4: Click Apply and OK button to confirm the change.
#2. Sort Files in Recycle Bin
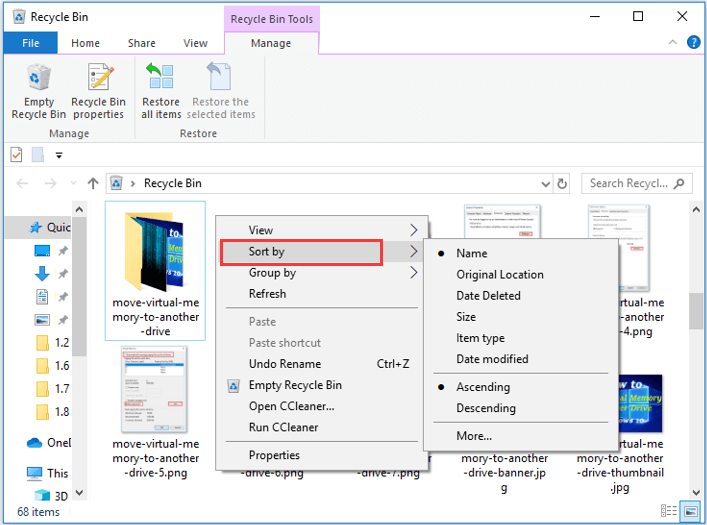
Recycle Bin will get much messy when there are too many files. And this makes it a challenge to locate a file or manage files in Recycle Bin. Sometimes, you might want to clear some unnecessary files to free up Recycle Bin storage space. To make things easier, you are recommended to sort the files inside.
Just open your Recycle Bin, right-click an empty area and choose Sort by. As the following screenshot shows, you can sort your files by name, original location, size, etc. Then, you can locate the unwanted files easily and delete them to free up your Recycle Bin.
#3. Delete Files Bypassing Recycle Bin and Show Confirmation Dialog
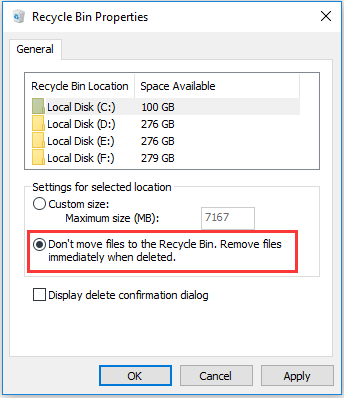
When you are sure that the files to be deleted is unimportant and you want to delete them permanently, you can set to delete files without putting them into Recycle Bin.
To do that, you need to enter the Properties window of Recycle Bin as mentioned above. Choose the Recycle Bin Location that you want to configure. Check the option Don’t move files to the Recycle Bin. Remove files immediately when deleted, and then click Apply and OK.
Besides, if you often press the Delete button to remove files by accident, you can check the Display delete confirmation dialog option in Recycle Bin Properties as well. By doing this, you will get a confirmation window every time you delete files.
With these settings, you don’t need to spend much time to clear unwanted files twice or restore important files often.
#4. Free Up Recycle Bin Space Automatically
Finally, you can schedule to free up your Recycle Bin space automatically in your Windows Settings. Just follow the steps below:
Step 1: Press Windows + I to open Settings app.
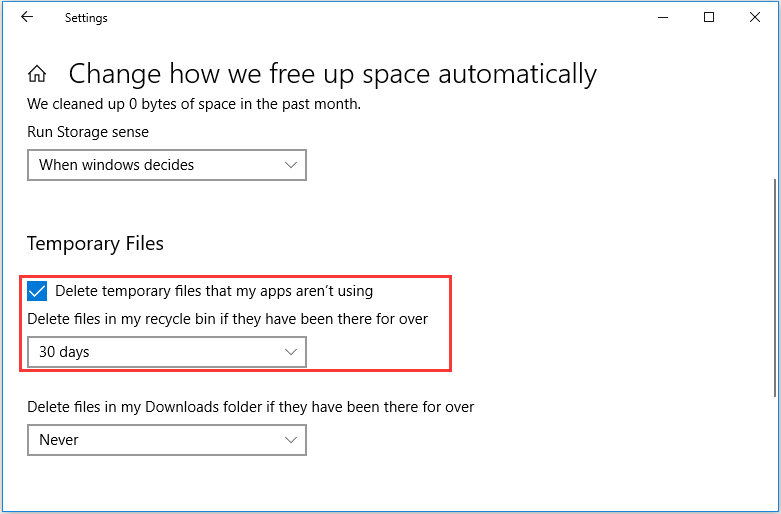
Step 2: Go to System > Storage. Then, click Change how we free up space automatically.
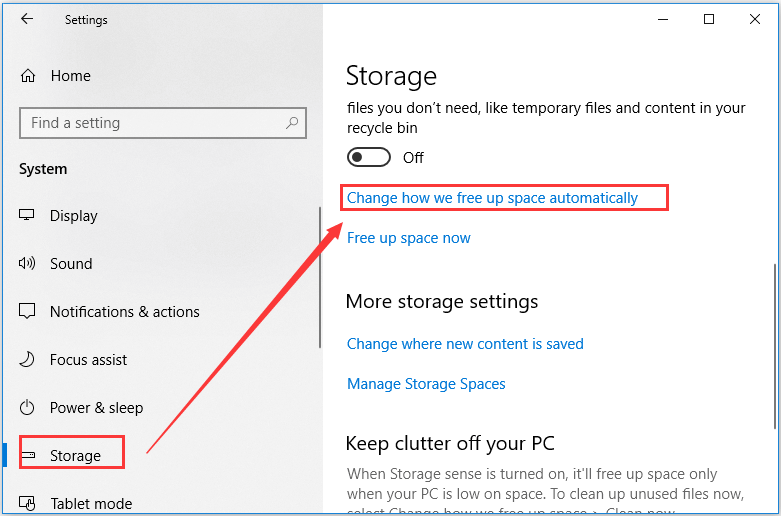
Step 3: In the new window, check Delete temporary files that my apps aren’t using option in Temporary Files section. Then, you can set to delete files from Recycle Bin automatically when they have been there for a specific number of days: 1, 14, 30, or 60 days.
User Comments :