What is Background Intelligent Transfer Service (BITS)? How to enable or disable this service? Any effective methods to fix the BITS issue? Today, you will get all these answers from MiniTool.
Background Intelligent Transfer Service (BITS) plays an important role in ensuring the system and application to work normally. It is a system component in the Windows operating system that helps download files and install updates from the Microsoft servers.
Once the BITS service stops working or your Windows 10 installation has issues with this service, the Windows updates, Microsoft Store, and other services will be affected subsequently. To fix problems with BITS, probably the following methods can help you.
![How to Disable Action Center Windows 10? [Complete Guide]](https://images.minitool.com/partitionwizard.com/images/uploads/2020/03/disable-action-center-win10-thumbnail.jpg)
How to Enable or Disable Background Intelligent Transfer Service
There are still lots of people are unclear about how to enable or disable BITS. Now, we will walk you through a quick guide.
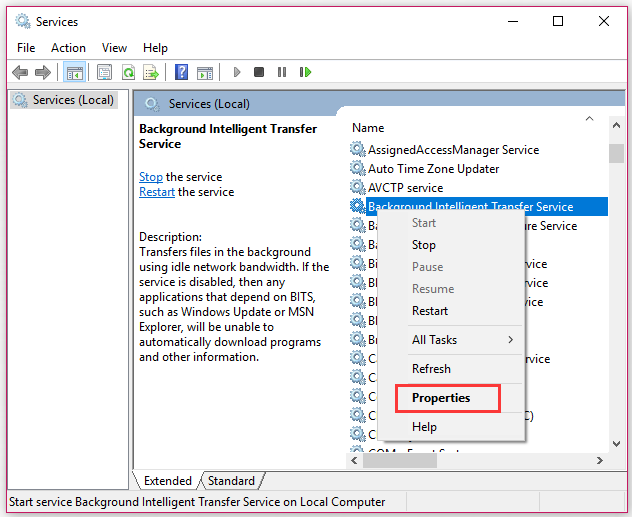
Step 1. Press the Win + R key to open the Run dialog box, and then type services.msc in it and hit Enter.
Step 2. In the pop-up window, right-click the Background Intelligent Transfer Service from the list of services and select Properties.
Step 3. Change the Startup type to Automatic, and then click on Start and click OK to save the change.
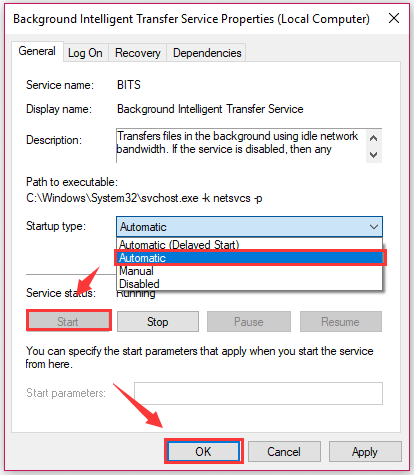
If you want to disable the BITS service, you can select the Disabled option from the drop-down menu and click on Stop and OK button.
Now, you may have an overall understanding of the BITS on Windows 10. What should you do to deal with the problems with BITS? Please keep reading the following parts.
Fix 1. Use Background Intelligent Transfer Service Troubleshooter
Using the troubleshooter is the most direct and simplest way to fix common problems with BITS on Windows 10. Here’s how to do that:
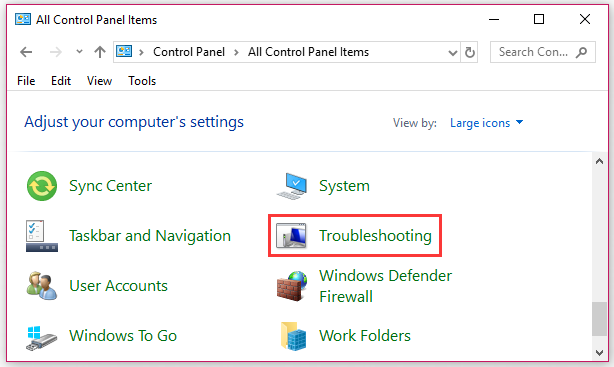
Step 1. Type control in the search box and select Control Panel from the top result.
Step 2. Change the View by to the Large icons and click on the Troubleshooting option.
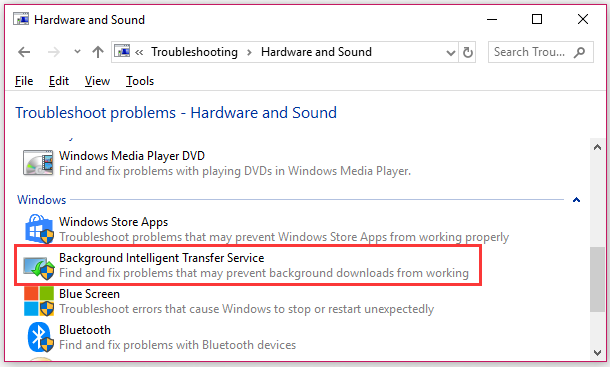
Step 3. Then click on Hardware and Sound > Background Intelligent Transfer Service troubleshooter.
Step 4. Click on Advanced option, and then select the Apply repairs automatically checkbox and click on Next to continue.
Step 5. Now, the troubleshooter will start detecting and fixing the problems with BITS automatically. You need to wait a moment for this process.
Fix 2. Use System File Checker and DISM
If the problems with BITS still persists after trying the troubleshooter, you can use the System File Checker and DISM. The 2 tools are commonly used to repair the issues with system components. For that:
Step 1. Type command prompt in the search box, and then right-click Command Prompt and select Run as administrator option.
Step 2. Type the sfc /scannow command in the elevated command prompt and hit Enter. After that, the SFC tool will scan and try to repair the system issues automatically.

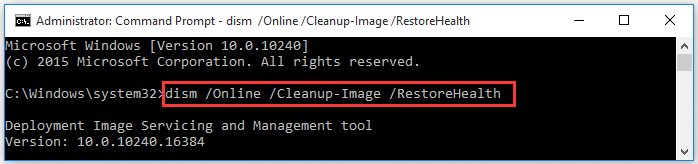
Step 3. If the SFC tool fails to work, you can try using the DISM tool. Type dism /Online /Cleanup-Image /RestoreHealth in the elevated command prompt and hit Enter.
Fix 3. Install the Latest Quality Windows 10 Updates Manually
If neither of the 2 above methods helps fix problems with BITS, it could be caused by the problem with Windows 10 installation. You may fix the issue by installing the latest quality Windows updates manually.
First of all, you need to check your system type to install the latest quality updates. If you are unclear about the way to check system type, read this post to get the detailed steps. And then continue the steps below to install the updates.
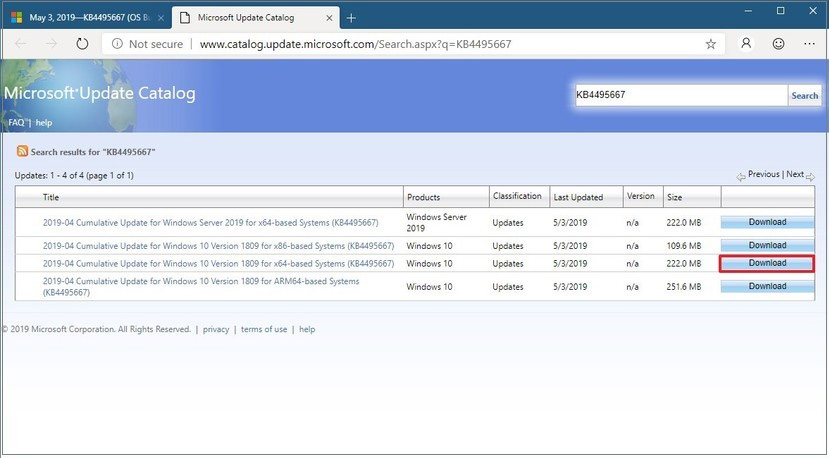
Step 1. Click here to open the Microsoft Update Catalog.
Step 2. Type KB4495667 (Windows 10 1903 update) in the search bar to find this latest Windows 10 version, and then click on the Download button based on your system type.
–image from microsoft.com
Step 3. Double click the .msu link.
Step 4. To install this latest patch, you need to open the elevated command prompt by the above method. Then type the following command in the command prompt and hit Enter.
wusa C:FOLDER-PATHUPDATE-NAME.msu /quiet /norestart
Step 5. Restart your computer and check if the problem with BITS is fixed.
User Comments :