Have you come across the “WD external hard drive not showing up” issue? If so, don’t worry. In this post, MiniTool Partition Wizard analyzes possible causes and shares several ways to solve this issue.
A lot of people report that they have encountered the “WD external hard drive not showing up” issue on their PCs. When this error occurs, the WD external hard drive won’t appear in File Explorer, disk management, device manager, or some other location on the PC.
Have you also encountered the same error? Do you want to know how to fix the “WD external hard drive not showing up” issue? This post lists the answers below. These solutions also work for these issues:
- WD external hard drive not recognized
- WD hard external drive not detected
- …
Why Is the WD External Hard Drive Not Detected?
Why is the WD external hard drive not detected? After investigating extensive user reports and posts, we find the problem can be caused by different possible reasons. Here are some of the most common reasons:
- The USB hub/USB cables are faulty, or the ports are dead.
- The external hard drive/USB port driver is outdated or corrupted.
- The file system of the external hard drive is corrupt.
- The drive letter of the WD hard drive is missing.
- The WD external hard drive gets infected by a virus or malware.
- You have enabled the USB Selective Suspend on your laptop for power-saving.
- You haven’t initialized and created partitions on the external hard drive.
- The file system of the external hard drive is incompatible with Windows OS.
- There are bad sectors on the external hard drive.
- The USB 2.0 port doesn’t have enough power to support the USB 3.0 external hard drive.
- The external hard drive has sustained physical harm, such as drops, impacts, or exposure to excessively high or low humidity levels.
Restore Data from WD External Hard Drive Not Showing Up
Before fixing the WD external hard drive not showing up issue, you’d better recover the data from the WD external hard drive to avoid making data unrecoverable.
To do that, MiniTool Partition Wizard is the best choice for you. It is a professional and comprehensive partition manager that can help you recover data on partitions and disks.
Moreover, it can help you create/extend/resize/format/copy partitions, check the file system, check for bad sectors, clone hard drive, change the cluster size, rebuild the MBR, wipe the disk, etc. You can use it to manage your partitions and disks with ease.
Here’s how to recover data via the MiniTool Partition Wizard:
Step 1. Click the Download button to get the MiniTool Partition Wizard installation package, and then follow the on-screen instructions to complete the installation.
MiniTool Partition Wizard DemoClick to Download100%Clean & Safe
Step 2. Launch into its main interface and click Data Recovery in the top toolbar.
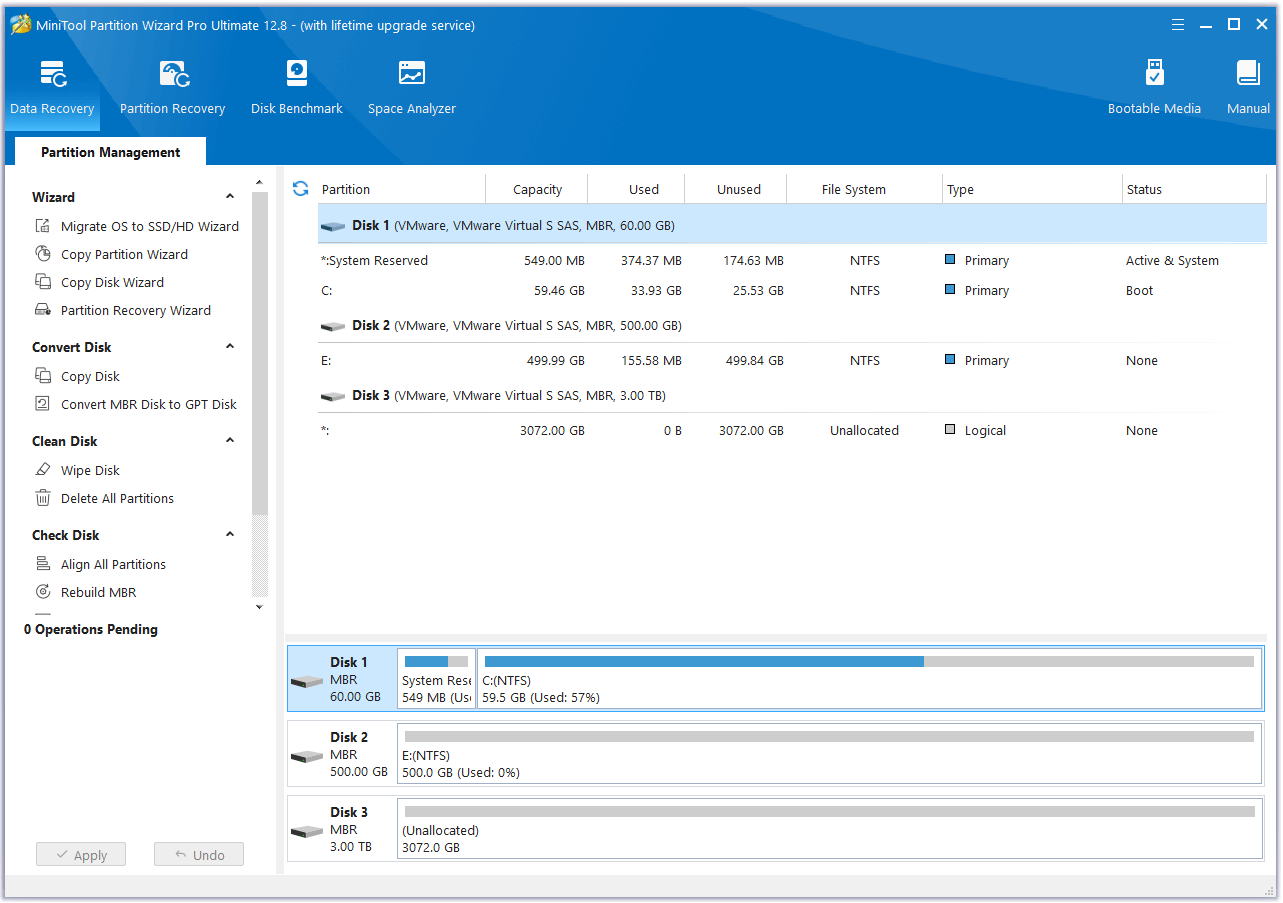
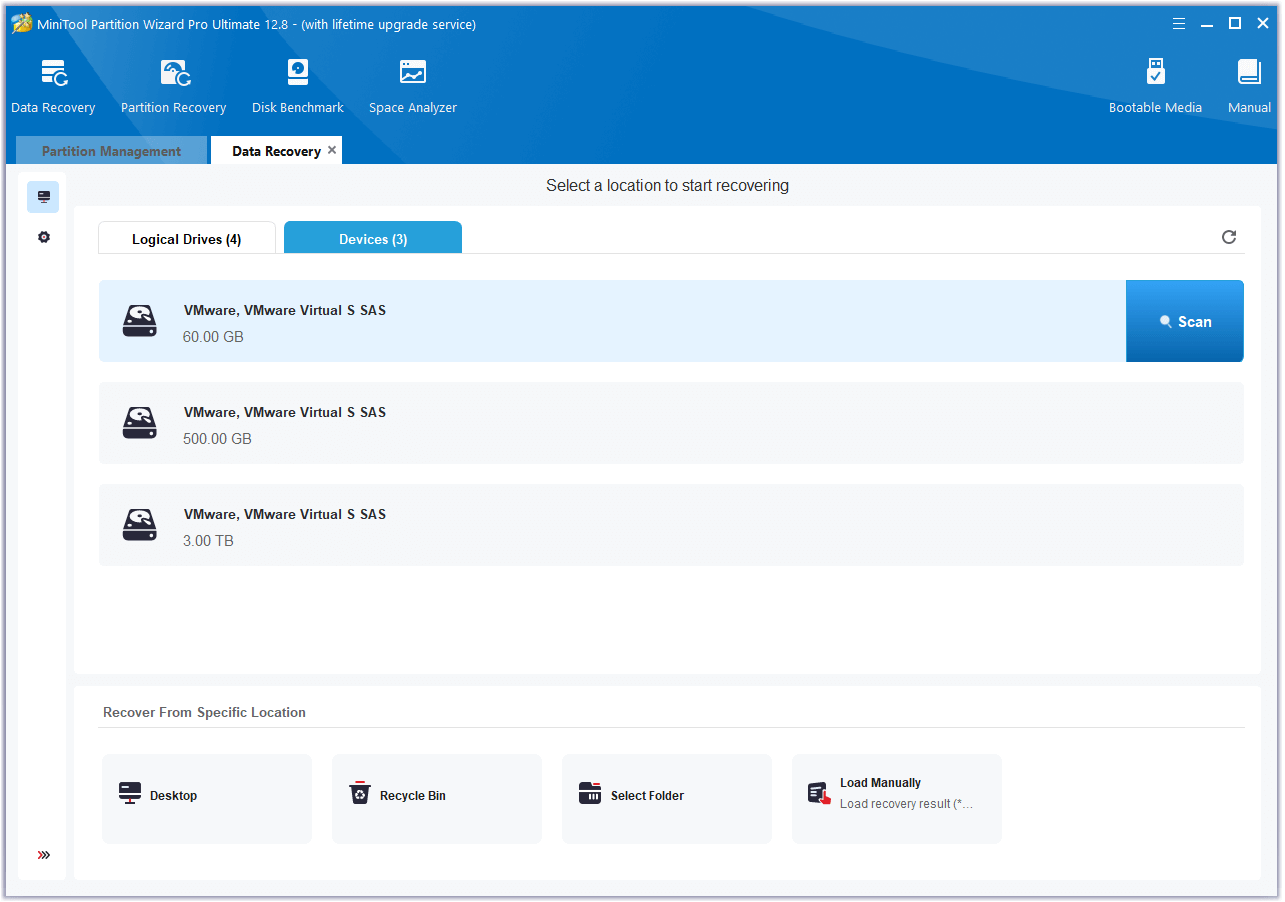
Step 3. Next, select a partition or device to recover data from, and then click Scan. Here, I select the first disk under the Devices tab.
Step 4. After that, you can see the program scanning your disk. While the scan is in progress, you can preview the scanned files and click the pause or stop icon to end it when you find all the necessary files.

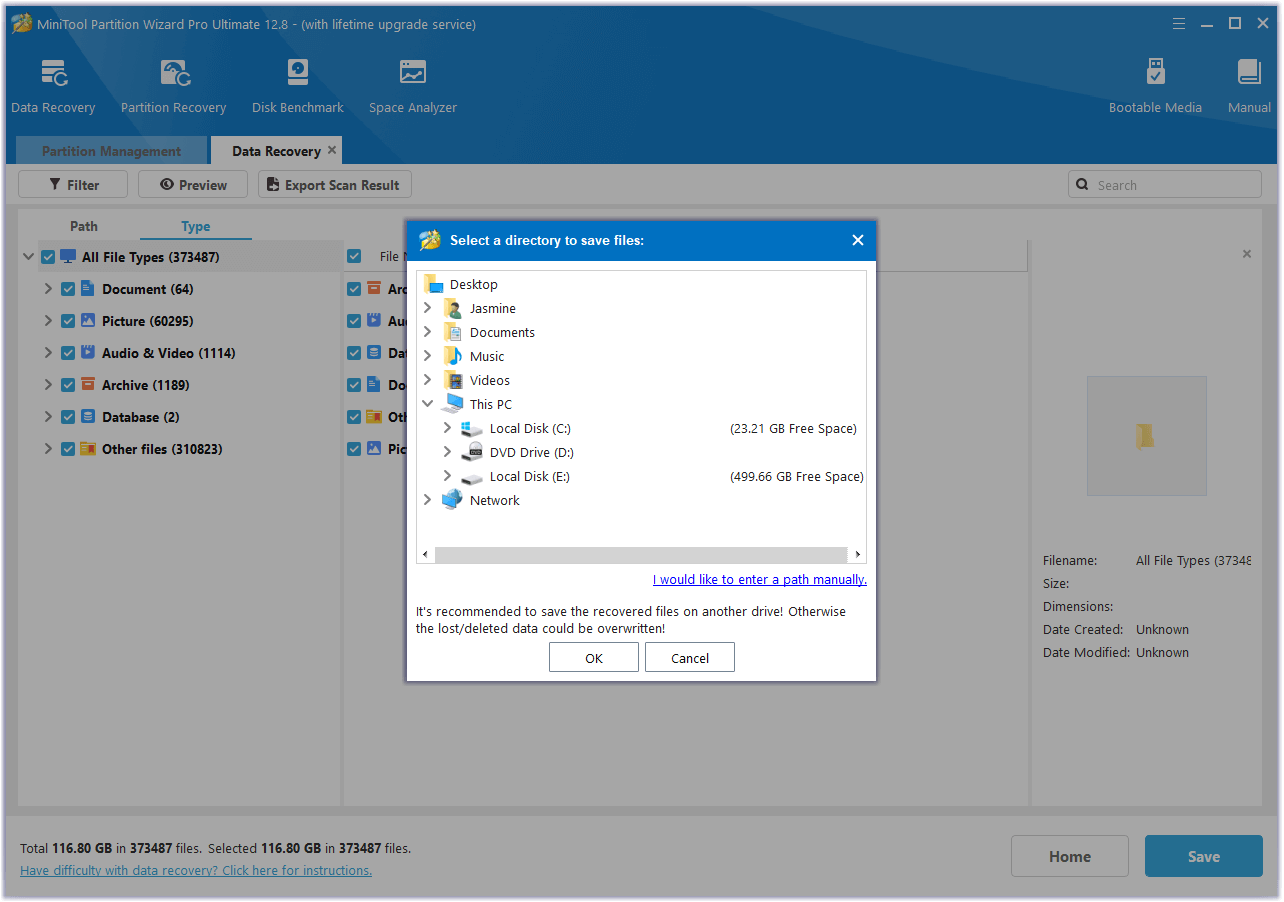
Step 5. Once the scanning is done, check the files you want to recover, and then click Save. Make sure to choose a secure location to store the recovered data. It is recommended not to save it on the original hard drive.
How to Fix the “WD External Hard Drive Not Showing Up” Issue?
How to fix the “WD external hard drive not showing up” issue? After investigating extensive user reports and references, we summarize 10 useful solutions to fix the WD hard external drive not detected on the PC issue. You can try these methods one by one until you fix the error successfully.
Method 1. Change the USB Port/Cable
From the above content, it’s clear that connection issues like faulty USB hubs/cables, dead ports, and unmatched USB ports can cause the “WD external hard drive not showing up” issue. In this case, you can try these fixes:
- Reconnect your WD hard drive to your computer with another USB port or a newer cable.
- Change a USB hub or directly plug the WD hard drive into your computer.
- Make sure the computer’s USB ports match the disk interface. For example, a USB 3.0 WD hard drive connects to a USB 3.0 port.
- If your WD hard drive has a separate power cable, you can directly connect it to the wall socket to avoid current loss.
Method 2. Turn USB Root Hub On
If method 1 is unable to help you fix the WD external hard drive not recognized issue, you can try turning the USB Root Hub on to fix this error. Here’s the way:
- Press the Windows and X keys simultaneously to open the Quick Link menu and then select Device Manager.
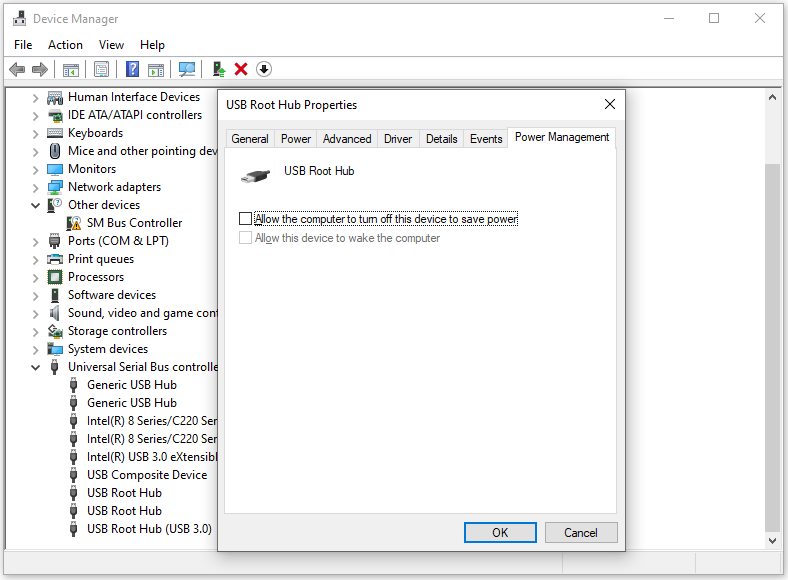
- Expand the Universal Serial Bus controllers.
- Right-click USB Root Hub, and then select Properties.
- Click the Power Management tab, and uncheck the box of “Allow the computer to turn off this device to save power”.
- Repeat these steps to make changes for all USB Root Hubs.
- After that, restart your PC and check if the WD external hard drive showing up on your PC.
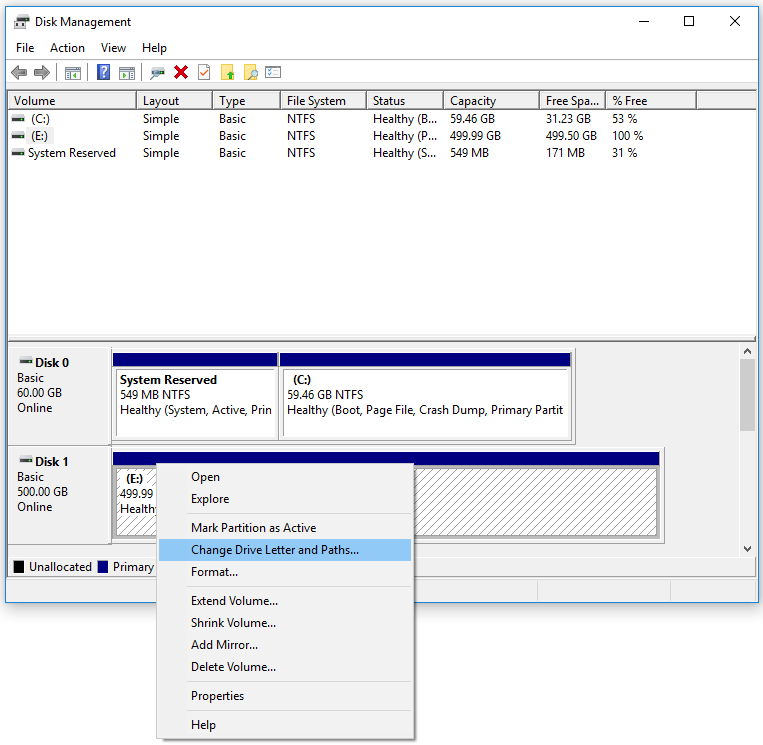
Method 3. Assign or Change the Drive Letter
Sometimes, the WD external hard drive may be hidden in your computer for some reasons. In this case, assigning or changing the drive letter is a useful way to show the WD external hard drive. You can have a try. Here’s how to do it:
- Open the Quick Link Menu and select Disk Management from the menu.
- Find your external hard drive and right-click it by choosing Change Drive Letter and Path.
- Assign the drive a new letter that doesn’t exist on your PC and mark the partition as Active.
- Next, click OK.
- Restart your PC and check if the WD external hard drive is detected by your PC.
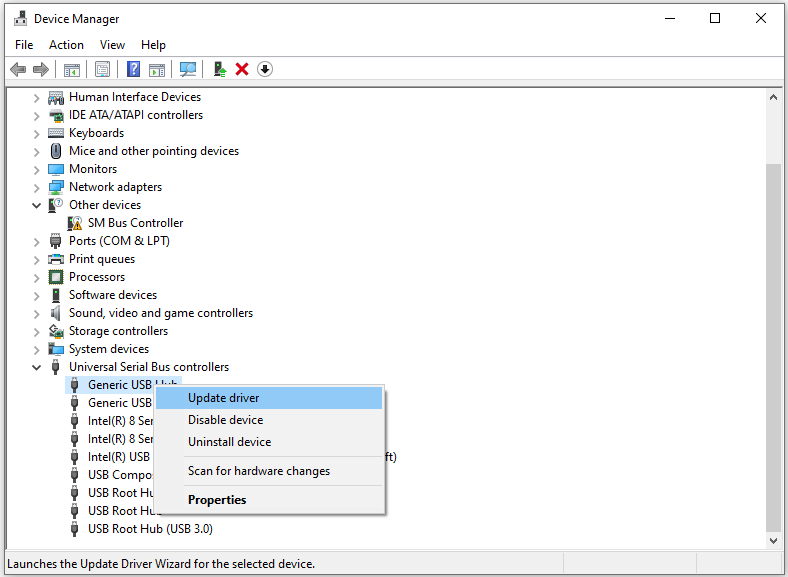
Method 4. Update/Uninstall USB Port and WD External Hard Drive Drivers
Outdated or corrupted USB controllers and WD external hard drive drivers may also cause the “WD external hard drive not showing up” issue. So, you can try updating the related drivers to fix this error. If updating the related drivers does not work, reinstalling them is also worth trying. Here’s how to do it:
- Open the Device Manager window.
- Expand the Universal Serial Bus controllers category.
- Right-click on each driver and select Update driver.
- Select the “Search automatically for drives” option.
- Then follow the on-screen instructions to complete the process.
After updating all the drivers in this category, restart your PC and check if the error is fixed. If the error still persists, right-click on each driver under this category, select Uninstall device, and then click Uninstall. Once done, restart your PC and check if the “WD external hard drive not showing up” issue is fixed.
If not, you need to expand the Disk drivers category and do the same steps for the WD external hard drive driver.
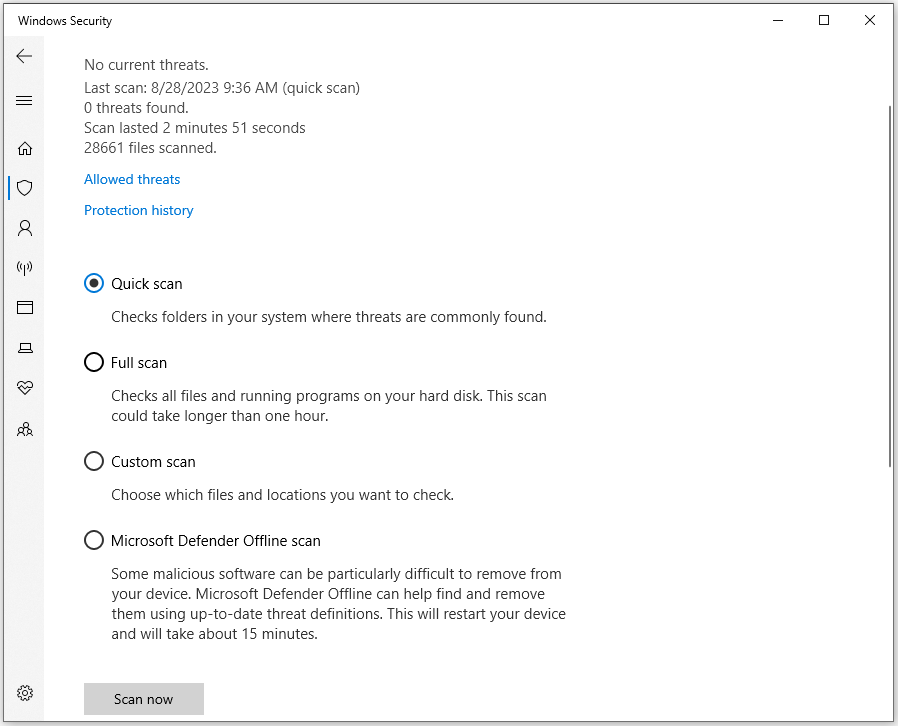
Method 5. Scan for Virus or Malware
If the WD external hard drive gets infected by a virus or malware, you can also encounter the WD external hard drive not showing up issue. In this situation, you can try scanning your PC for viruses and malware. Here’s the way:
- Press the Windows and I keys simultaneously to open the Settings window.
- Navigate to Update & Security > Windows Security.
- Click Virus & threat protection.
- Click Scan options in the pop-up window.
- Choose a virus scanning way according to your needs, and then click Scan now.
- Wait for the scanning process to complete.
- Once done, check if the error has been resolved.
Method 6. Initialize WD Hard Drive in Disk Management
If this is your first time using the WD external hard drive and you encounter the “WD external hard not showing up” issue, you need to check if it has been initialized first. If it hasn’t been initialized before, you can try initializing it and creating a new partition to fix this error. Here’s how to do it:
Step 1. Press the Windows and R keys simultaneously to open the Run window.
Step 2. Type “diskmgmt.msc” in the box and then click the OK button.
Step 3. In the Disk Management window, find the new SSD drive that is not showing up.
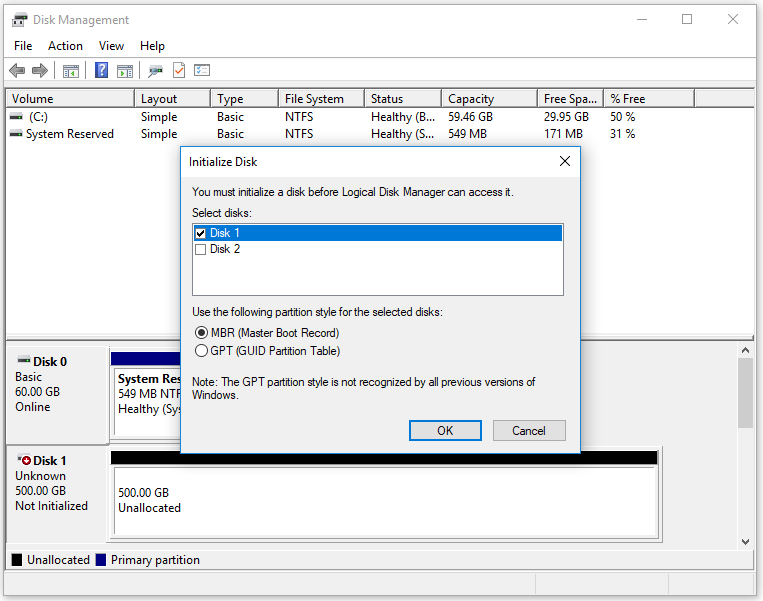
Step 4. If it shows “Not Initialized”, right-click the disk and select Initialize Disk.
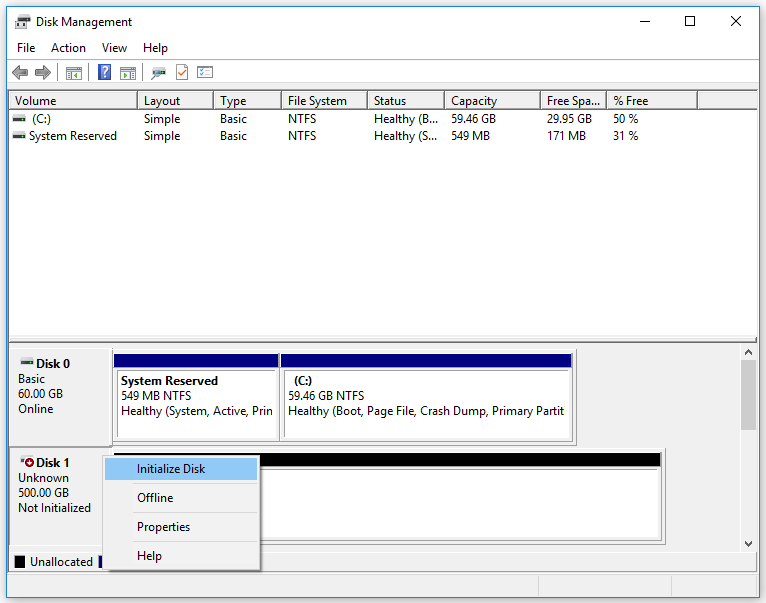
Step 5. Choose the partition style MBR or GPT as per your requirements for your SSD and click OK to initialize the SSD.
Step 6. After initializing the SSD successfully, you need to create and format a new partition. Right-click the unallocated space on the SSD and select “New Simple Volume“.
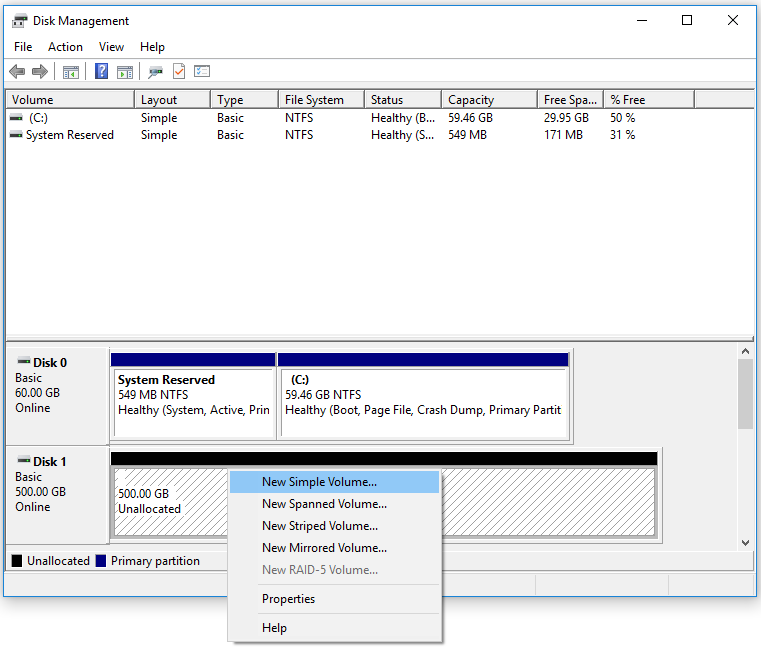
Step 7. Follow the instructions on the screen to create and format a new partition. After the partition is created and formatted, restart your PC and see if the WD external hard drive shows up.
Method 7. Format WD External Hard Drive to a Compatible File System
If your WD external hard drive has been formatted to a file system that is unable to be recognized by the Windows OS or the WD external hard drive’s file system is corrupt, you can try formatting it to a compatible file system to troubleshoot the “WD external hard drive not showing up” issue.
Before formatting the external hard drive, you can run the CHKDSK to check and fix the error. Here’s the way:
- Open the Run window, type “cmd”, and press Ctrl + Shift + Enter to run Command Prompt as administrator.
- Type “chkdsk /f X:” and press Enter. (X: is the letter of the drive that’s not getting recognized.)
- Wait until the operation is finished.
Once the CHKDSK scanning and fixing process is done, you can also use Command Prompt to format the partition to NTFS or FAT32 if the error persists. Here are the detailed steps:
- Open the Command Prompt as administrator.
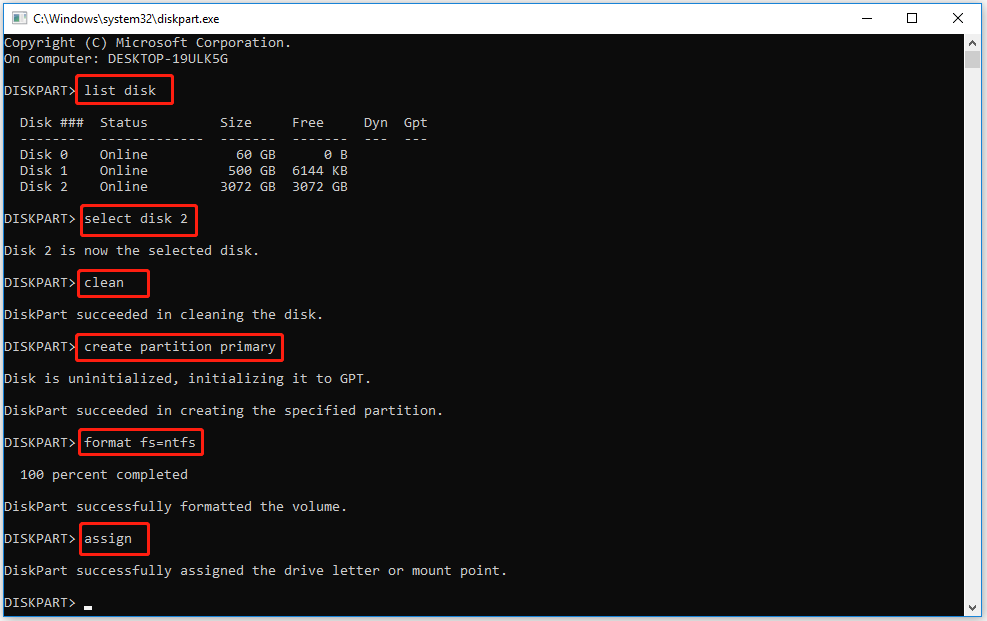
- Type “diskpart” and press Enter.
- Type “list disk” and press Enter to list all the available drives.
- If your external hard drive is here, type “select disk X” (replace X with the disk number) and press Enter to select your external hard drive.
- Type “clean” and press Enter to clean up the disk.
- Type “create partition primary” and press Enter to make the drive again accessible.
- Type “format fs=ntfs” and press Enter to format the drive to NTFS.
- Nest, type “assign” and press Enter to assign the drive letter to the newly created partition.
Method 8. Check Bad Sectors on External Hard Drive
If formatting the external hard drive to a compatible file system does not work for the “WD hard external drive not detected” issue, you can suspect that there are bad sectors on your external hard drive. To check that, you can use MiniTool Partition Wizard’s Surface Test features.
Here’s how to use the Surface Test feature:
MiniTool Partition Wizard FreeClick to Download100%Clean & Safe
- Launch MiniTool Partition Wizard to its main interface.
- Choose the WD external hard drive, and then select Surface Test from the left pane.
- Click Start Now in the pop-up window.
- Once done, undamaged blocks are green, and damaged ones are red.
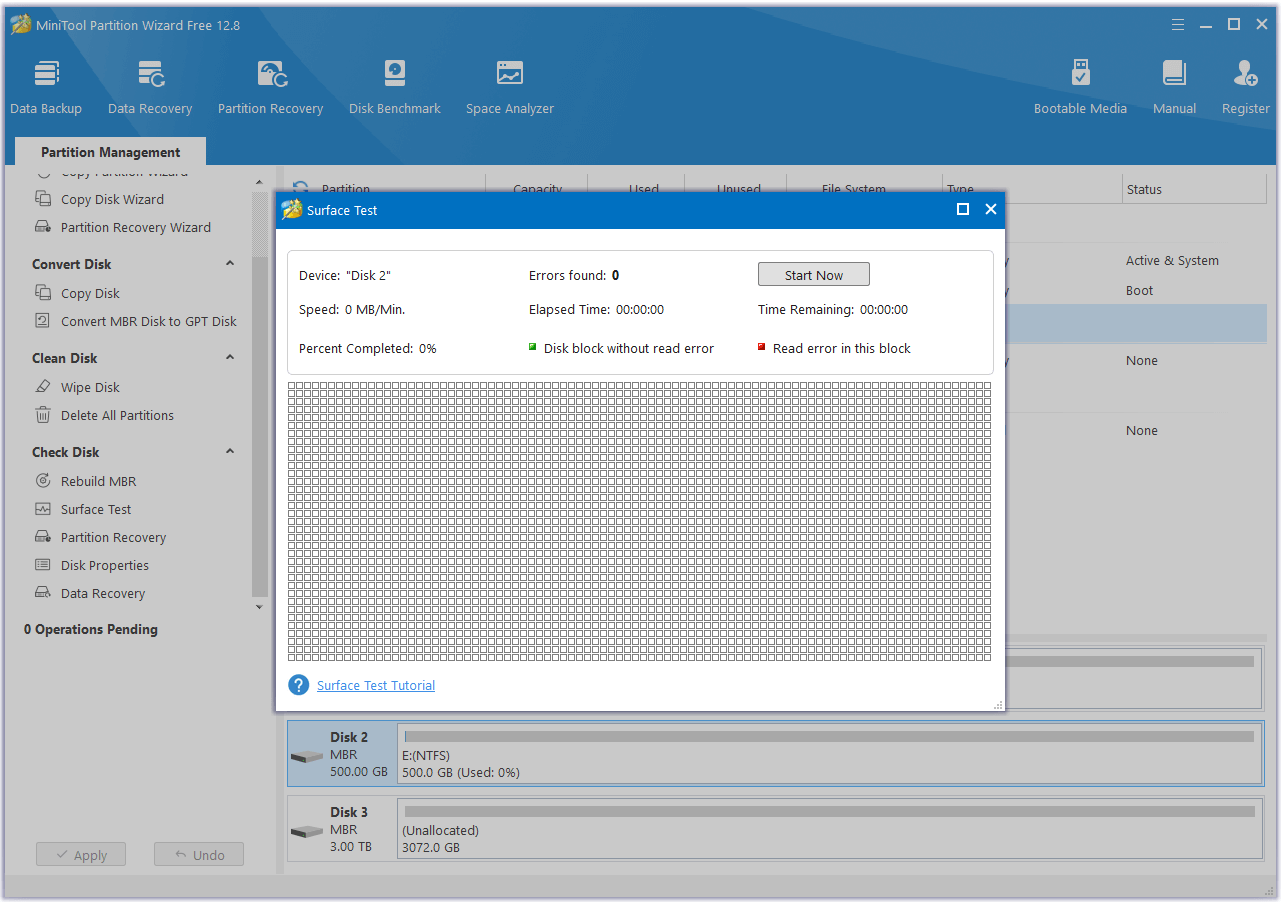
If there are many red blocks shows in the scanning result, it means that the external hard drive is damaged. So, you need to switch it to a newer one.
Method 9. Disable USB Selective Suspend
If you are using a laptop and enable USB Selective Suspend before for power saving, you can encounter the “WD external hard drive not showing up” issue easily. In this case, you can try disabling the USB Selective Suspend feature to fix the error. Here’s the way:
- Open the Search window, type “control panel”, and then press Enter.
- Set View by as Category, and then select Hardware and Sound.
- Choose Power Options and then click Change plan settings.
- Click on the Change plan settings link next to the plan option you’re having now.
- Scroll down to USB settings, and then disable On Battery and Plugged In.
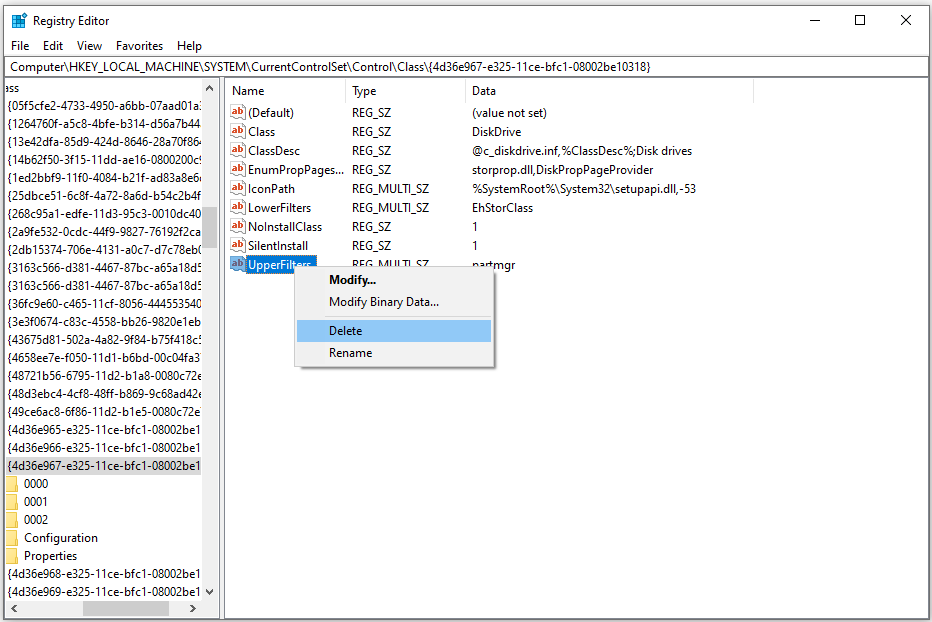
Method 10. Change Registry
Some people report that changing the Registry helps them fix the “WD hard external drive not detected” issue. You can also have a try. To do that, you just need to do the following steps:
- Open the Search window, type “regedt32”, and then press Enter.
- Then click Yes in the UAC window.
- Navigate to HKEY_LOCAL_MACHINE\SYSTEM\CurrentControlSet\Control\Class\{4D36E967-E325-11CE-BFC1-08002BE10318}.
- If you see any upper filter or lower filters on the right side, delete them.
- Then retry your external hard drive again.
If none of the above methods can help you fix the WD external hard drive not detected issue, you can suspect the WD external hard drive is broken up physically. In this case, the only option you have is to replace it with a newer hard drive.
Have A Try Now
How to fix the “WD external hard drive not showing up” on Windows? Now, you may already get the solutions. You can try these ways to fix the issue on your PC. If you have any other useful solutions to this problem, you can leave them in the comment zone.
In addition, if you encounter any problems while using MiniTool Partition Wizard, you can send an email to [email protected]. We will feed you back as soon as possible.
About The Author

Position: Columnist
Charlotte is a technology columnist with a strong focus on the Windows operating system, specializing in disk management, backup, and data recovery. She is passionate about analyzing computer errors, identifying root causes, and delivering practical solutions. In her free time, she stays updated on the latest developments in computer systems and hardware while continuously learning new technologies to broaden her expertise. Her writing style is clear and easy to understand, making complex technical topics accessible even to users with limited computer knowledge.
User Comments :