In computing, the Recycle Bin is a place used to store temporarily deleted files. In this post from the MiniTool Partition Wizard website, you can learn about how to change Recycle Bin settings Windows 11.
On Microsoft Windows operating systems, Recycle Bin is an area temporarily storing deleted files that are not permanently erased.
On a Windows PC, every partition is designed with its own Recycle Bin settings which are stored in a hidden system folder “$RECYCLE.BIN”. If you want to view the folder, you need to show Hidden items in File Explorer first. Then you can go to the root directory of a partition and scroll down to find the folder. Alternatively, you can search for the folder in the partition.
Usually, if you delete a file, it will go to the Recycle Bin, and you can restore the file to the original directory when you need it.
However, Recycle Bin can only store limited files. When the storage of Recycle Bin runs out of space, it will remove some files automatically, which means you will not be able to restore removed files from Recycle Bin anymore. If you want to store more files in Recycle Bin, you can increase Recycle Bin storage size.
How to Change Recycle Bin Settings Windows 11
Windows 11 is a new operating system released by Microsoft in 2021. It is designed as the successor to Windows 10. Compared with Windows 10, Windows 11 has a different outlook and many improved features. If you are a Windows 10 user and your PC supports Windows 11, you can upgrade your Windows 10 to Windows 11 free.
Windows 11 allows you to customize Recycle Bin according to your preferences. And you can follow the steps below to change Recycle Bin size.
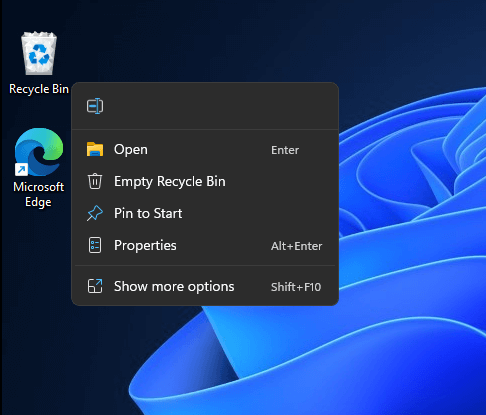
Step 1: Right-click Recycle Bin on your desktop and select Properties.
Step 2: In the pop-up window, select the target partition under the Recycle Bin Location section.
Step 3: Under the Settings for selected location section, input a number in the box to change the maximum size in MB.
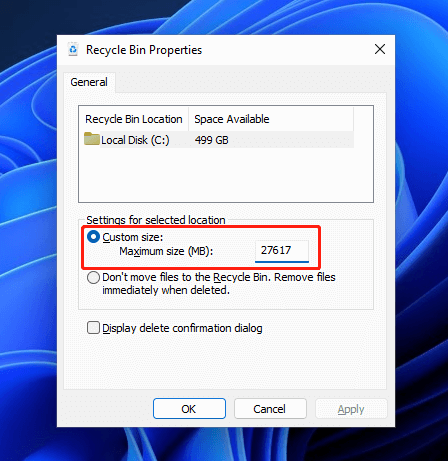
If you want to delete files without Recycle Bin, you can select the option “Don’t move files to the Recycle Bin. Remove files immediately when deleted”. With this option enabled, deleted files won’t be stored in Recycle Bin and you don’t need to waste time to clean up Recycle Bin. At the same time, you cannot restore your deleted files from Recycle Bin.
You can also check the “Display delete confirmation dialog” option according to your needs. Once it is enabled, you will receive a pop-up window saying “are you sure you want to move this file to the Recycle Bin” when you delete a file, and you can click Yes to continue. Enabling this feature can prevent you from deleting files by accident.
Step 4: Click Apply and OK to save the changed settings.
Further Tip: How to Recover Permanently Deleted Files
If you press the Shift key while deleting a file, the file will be permanently deleted and won’t be moved to Recycle Bin. In this case, you can’t restore the file from Recycle Bin. Then, how to recover the file when you want to get it back?
Don’t worry. MiniTool Partition Wizard can help you. It is a professional partition manager as well as a reliable file recovery tool. Click the button below and follow the tutorial below to have a try!
MiniTool Partition Wizard DemoClick to Download100%Clean & Safe
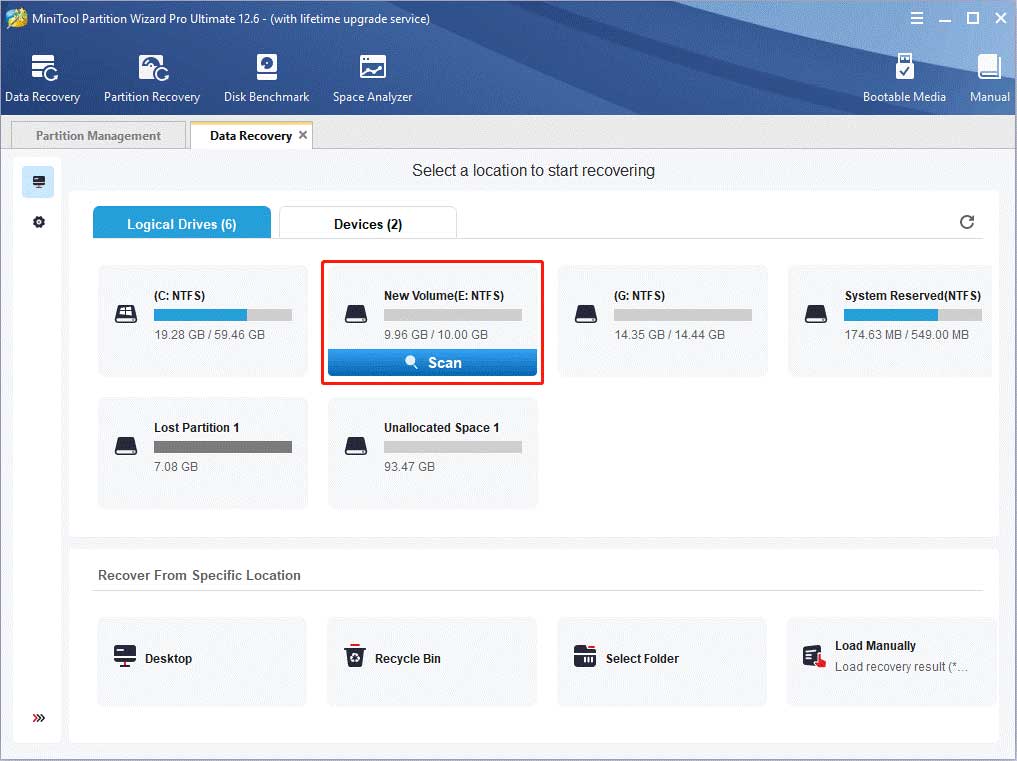
Step 1: Launch MiniTool Partition Wizard and click the Data Recovery feature from the top toolbar.
Step 2: Double-click the partition that contains the lost files to scan the partition.
Step 3: Check needed files and click the Save button.
Step 4: Select a different partition to save recovered files. Please do not store recovered files in the same location.
User Comments :