Is your Steam Deck storage full? How to upgrade Steam Deck storage? This post from MiniTool Partition Wizard shows you the detailed Steam Deck SSD upgrade process. You can follow it to increase the Steam Deck's internal storage.
What Is Steam Deck?
A Steam Deck is a handheld gaming computer developed by Valve and released on February 25, 2022. The device uses Valve’s Linux distribution SteamOS, which uses Valve’s Proton compatibility layer, allowing users to run Windows applications and games. Therefore, with a Steam Deck, you can play Windows games on a handled console.
In addition to handheld use, Steam Deck can be connected to a TV or monitor through a docking station and be used like a desktop computer or home video game console. In desktop mode, users can install Linux-based third-party applications.
Can You Upgrade Steam Deck Storage?
Many people may purchase a Steam Deck because it can allow you to play PC games anywhere. However, some people may think that the storage of the Steam Deck is not enough because the capacity is only 64GB, 256GB, or 512GB (the specific capacity depends on the model you choose).
Can you upgrade Steam Deck storage? The answer is YES and here are 3 ways for you.
- Add an SD card.
- Add a USB drive.
- Upgrade the internal SSD.
How to Add an SD Card to Steam Deck
Steam Deck has a microSD card slot that supports UHS-I Bus. This Bus limits the speed of the SD card to 104 MB/s. In addition, Steam Deck currently supports microSD cards up to 1TB in size. While 2TB microSD cards will be available soon, it is unknown if Steam Deck will support them.
If you add an SD card to Steam Deck, you can run games from the SD card, but the game running speed will be much slower. How to upgrade Steam Deck storage by adding an SD card? Here is the guide:
Step 1: Insert the microSD card into your Steam Deck. The microSD card slot is located on the lower side of the Steam Deck device.
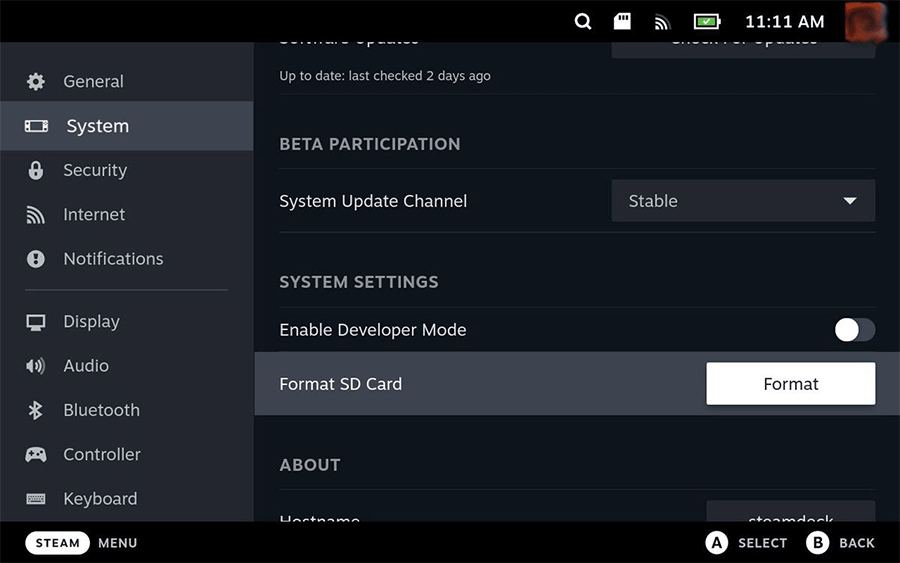
Step 2: Once the microSD card is inserted, the Steam Deck will detect it and a SD card icon will appear on the top section of the Steam Deck screen. You can tap it to open Settings and then System directly.
Step 3: Scroll down the right panel to select Format SD Card. Confirm this operation and wait until the format process is completed.
Then, you can use the microSD card on your Steam Deck. The next time you install a game, you’ll get the option of saving it to the Internal Drive or the MicroSD Card. If you want to install games on the SD card, just choose the MicroSD Card option.

How to Add a USB Drive to Steam Deck
Steam Deck has a USB Type-C port that supports USB 3.2 Gen 2 (10Gbps) and DisplayPort 1.4. If you want to upgrade Steam Deck storage, you can also add a USB drive or external hard drive to your Steam Deck.
The advantage of this Steam Deck storage upgrade way is that the USB speed can be up to 1250 MB/s. This way also has some defects, for example:
- The connection between the USB drive and Steam Deck may be loose sometimes.
- The USB drive has to be mounted and adopted over and over again (seems to drop off frequently).
- The USB drive may automatically mount in Desktop Mode, but not Gaming Mode (you’ll need some script to run from gaming mode every time you reboot).
How to set up the external hard drive so that your Steam Deck can boot it each time you reload? How to make the hard drive work in both Gaming Mode and Desktop Mode? A few tweaks are needed. As for the detailed guide, you can refer to this post: How to Set Up External Hard Drives on the Steam Deck.

How to Upgrade Steam Deck SSD
If you are not satisfied with the above Steam Deck storage upgrade methods, you can try the Steam Deck SSD upgrade method. The defect of this method is that all models use socketed 2230 m.2 modules (not intended for end-user replacement).
In addition, Valve warns that the Steam Deck SSD replacement may cause higher power consumption, heat dissipation failure, electromagnetic compatibility issue, and electrostatic breakdown. If your Steam Deck is damaged by the Steam Deck SSD replacement, the warranty will be invalidated.
Pick an SSD for Steam Deck
Before proceeding, you need to purchase an SSD for Steam Deck. In general, a Steam Deck compatible SSD should meet the following requirements:
- The Steam Deck SSD size should be 2230 M.2. This Steam Deck SSD size can work even in the Steam Deck 64GB model.
- The Steam Deck 64GB model uses PCIe Gen 2 x1 protocol, while the Steam Deck 256GB and 512GB models use PCIe Gen 3 x4 or PCIe Gen 3 x2 protocol. If possible, make sure the purchased M.2 SSD uses the correct protocol.
Steam Deck SSD Upgrade – Clean Install SteamOS
After getting a Steam Deck compatible SSD, you can start the Steam Deck SSD upgrade process. The guide is as follows:
Step 1: Remove the SD card and the USB drive from your Steam Deck if they are connected.
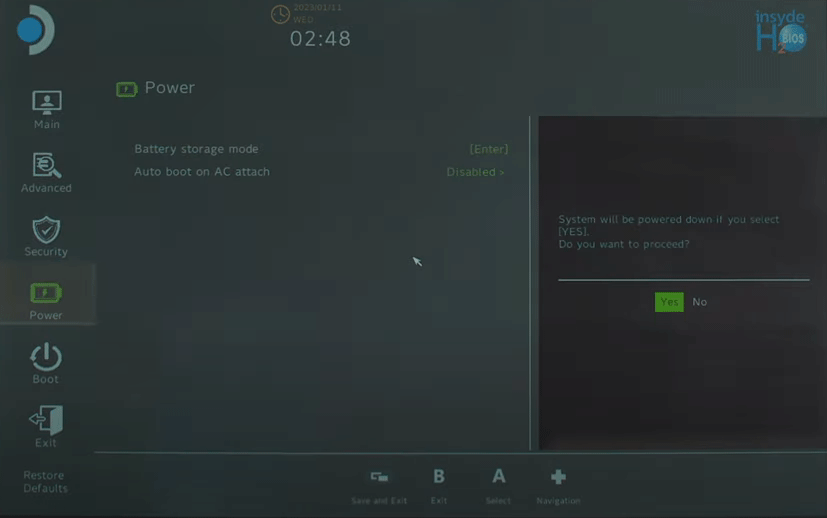
Step 2: For safety, it is recommended that you discharge the Steam Deck’s battery below 25%. Then, boot into BIOS and turn on the battery storage mode. Here are the steps:
- Power down your Steam Deck.
- Once off, hold down the Volume Up (+) button and press the Power button.
- Release both buttons and your Steam Deck should boot into the BIOS menu.
- Go to Setup Utility > Power, select Battery storage mode, and select Yes to confirm.
Step 3: Use a Phillips driver to remove the eight screws securing the back cover. Then, remove the back cover. An opening pick may be needed.
Step 4: The inside of the Steam Deck looks like the following picture. You need to use a pair of tweezers to pull the piece of foil tape covering the hidden screw on the board shield. Only pull it just enough to see the screw underneath because you need to reuse the piece of foil tape.
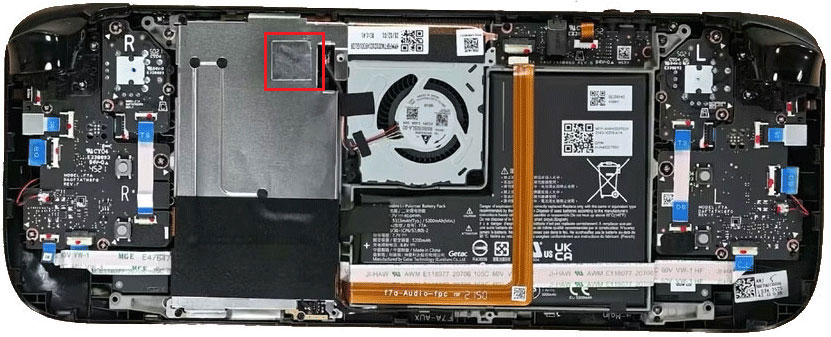
Step 5: Use a Phillips driver to remove the three screws securing the board shield and then remove the board shield. Now, you will see the SSD. To remove the SSD, you should do as follows:
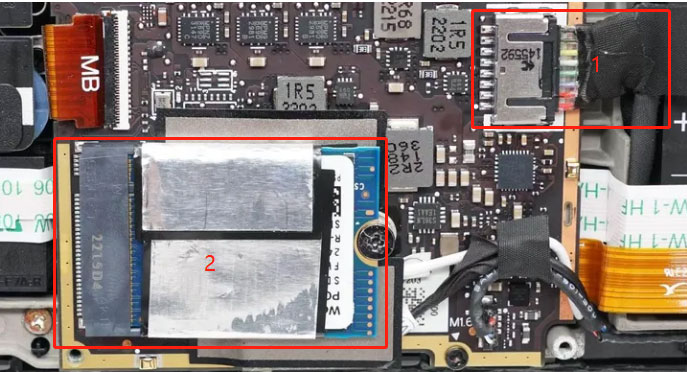
- Grip the battery cable by its pull tab and pull it directly away from the motherboard to disconnect it. The battery cable is near the SSD.
- Use a Phillips driver to remove the screw securing the SSD. Then, you can remove the SSD.
- As you can see, the SSD is wrapped in ESD shielding. You need to use a pair of tweezers to slightly slide the shielding off of the SSD. Please keep it in the best condition because you need to reuse it.
- Wrap the new SSD into the ESD shielding and then install and fasten it on your Steam Deck.
Step 6: Reassemble your Steam Deck by following the above steps in reverse order. Connect the battery cable, place and fasten the board shield, and close the back cover. Once done, you can start clean installing SteamOS.
Step 7: Download the SteamOS recovery image on your PC. Insert a USB drive of at least 8GB into your PC. Then, use Rufus (for Windows) or Balena Etcher (for macOS or Linux) to burn the SteamOS image to the USB drive.
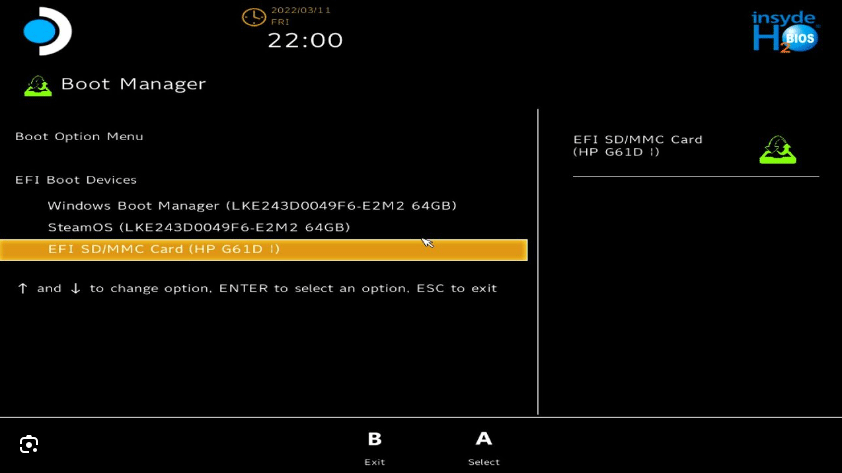
Step 8: Connect the USB drive to your Steam Deck. If the USB drive doesn’t have the USB Type-C interface, you need to use a USB-C adapter or hub. Then, shut down your Steam Deck. Hold the Volume Down button and click the Power button. Next, let go of the Volume Down button when you hear the chime. You’ll be booted into the Boot Manager.
Step 9: In the Boot Manager, boot from the EFI USB Device. The screen will go dark and then you will be in a desktop environment. In the recovery environment, you need to select Reimage Steam Deck. This will permanently destroy all data on your Steam Deck and reinstall SteamOS. Choose Proceed to confirm.
After the installation is completed, you can use your Steam Deck normally.

Steam Deck SSD Upgrade – Clone SteamOS
If you clean install SteamOS, you need to redownload and reinstall all of your games. If you want to avoid this work, you can clone SteamOS. If you have a Windows PC, I recommend you use MiniTool Partition Wizard to clone SteamOS. This disk partition software can clone hard drive to another one with just a few clicks. Here is the guide:
MiniTool Partition Wizard DemoClick to Download100%Clean & Safe
Step 1: Take out the SSD from your Steam Deck and connect it to your PC via an M.2 to USB adaptor. Then, connect the new SSD to your PC, too. Download, install, and launch MiniTool Partition Wizard. Then, click Copy Disk Wizard.
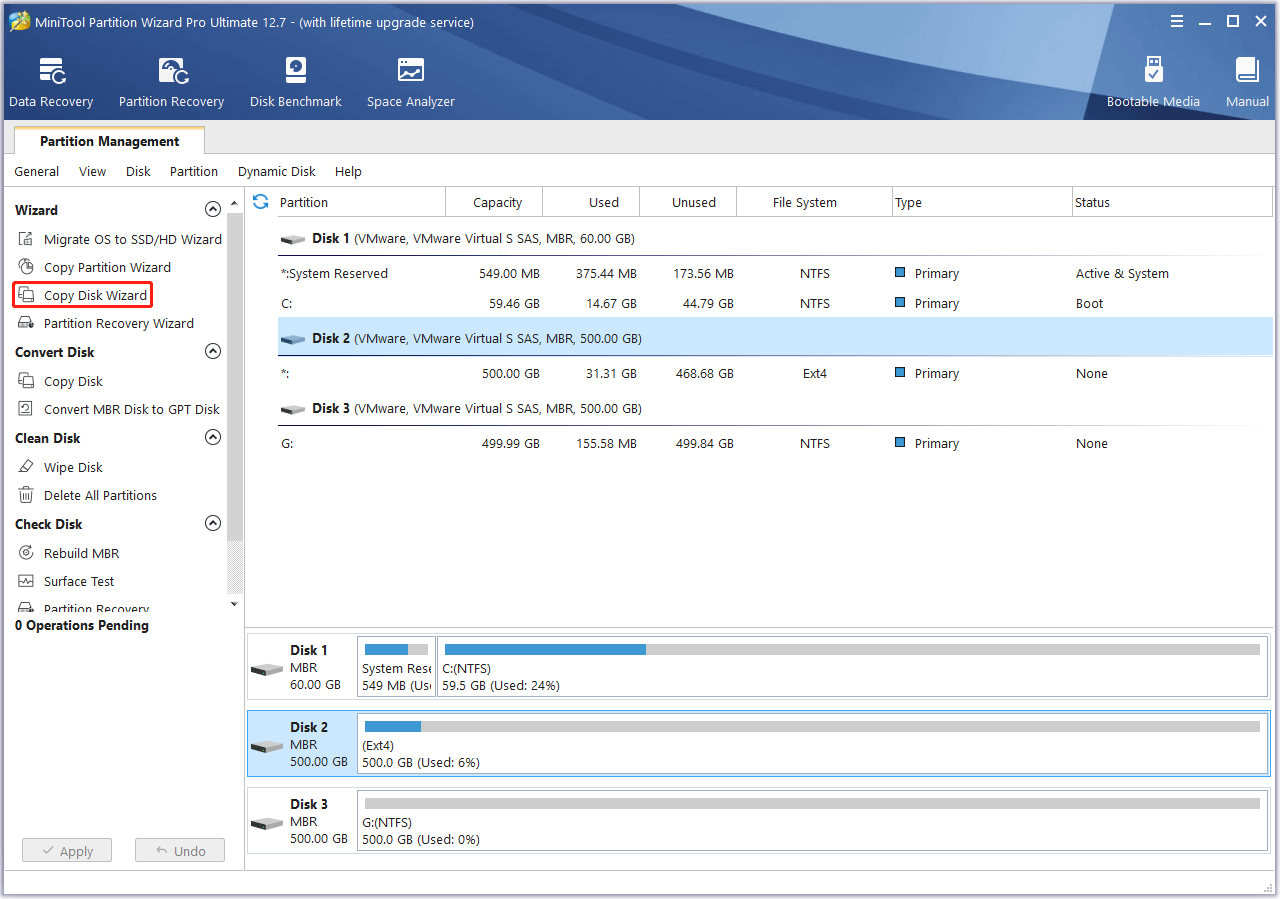
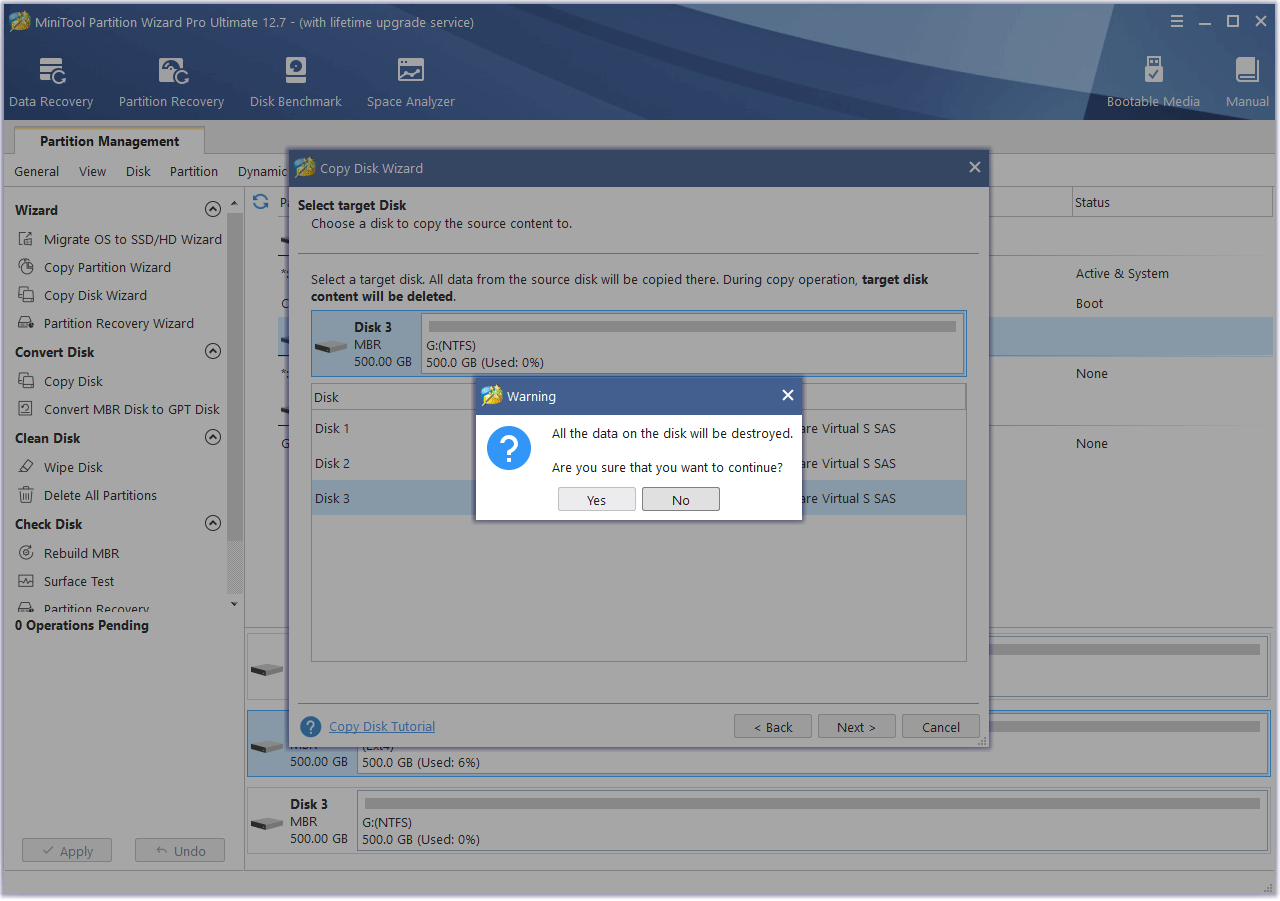
Step 2: Click Next. Select the Steam Deck SSD to copy and click Next. Select the new SSD as the target disk and click Next. You are warned that all data on the target disk will be destroyed. Click Yes to continue.
Step 3: Review the changes. In this step, you need to select the Copy Option 2 – Copy partitions without resizing because MiniTool Partition Wizard doesn’t support resizing EXT4 partitions. Then, keep others as the default value and click Next.

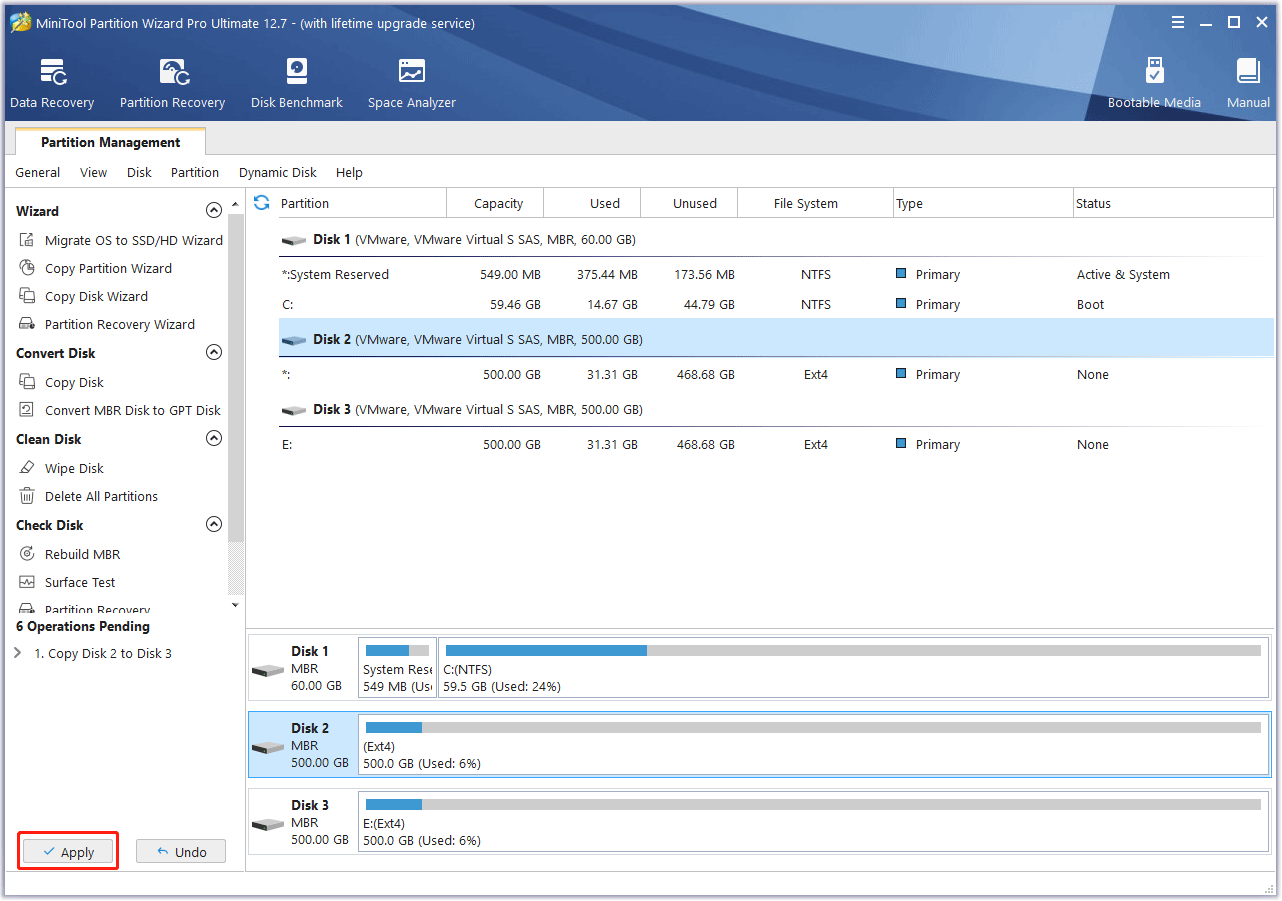
Step 4: Click Finish. Then, click Apply to execute the pending operation. If you want to use the rest space of the new SSD, you can then right-click the unallocated space and choose Create. Set the File System as EXT4. Then, you can create an EXT4 partition for use.
Step 5: Now, you need to install the new SSD into your Steam Deck for use.
Bottom Line
Is this post useful to you? Do you know other Steam Deck SSD upgrade ways? Share them with us in the following comment zone. In addition, if you encounter problems when using MiniTool Partition Wizard, please feel free to contact us via [email protected]. We will get back to you as soon as possible.
About The Author

Position: Columnist
Linda has been an editor at MiniTool for seven years. She continuously learns about computers and puts her knowledge into practice. Moreover, she is particularly knowledgeable in disk management, data recovery, system installation, and PDF editing. Her articles typically reference multiple examples or are based on her own experience, providing users with the most suitable solutions.
User Comments :