About Mfc42.Dll Not Found or Missing Error
Do you know what the mfc42.dll file is? It is a base file of the Microsoft Foundation Class Library (which is a C++ object-oriented library for developing desktop applications for Windows).
However, it is easy for any Windows system to encounter the mfc42.dll error. Here are some of the most common situations:
- You have removed the mfc42.dll file by accident.
- The mfc42.dll file on your PC is corrupted.
- There are some registry problems on your PC.
- There are some viruses or malware on your PC.
- There is something wrong with your hardware.
- The Windows system on your PC is outdated.
Different computer configurations may cause different mfc42dll errors to occur. So, when you encounter the mfc42dll error on your PC, you can see error messages like:
- Mfc42.dll not found.
- This application failed to start because mfc42.dll was not found. Re-installing the application may fix this problem.
- Cannot find [PATH]\mfc42.dll.
- The file mfc42.dll is missing.
- Cannot start [APPLICATION]. A required component is missing: mfc42.dll. Please install [APPLICATION] again.
- Faulting module mfc42.dll.
After knowing the basic information about the mfc42dll error, you may want to know how to fix the mfc42.dll not found or missing error as soon as possible. Here are some potential methods. You can have a try.
Method 1. Restore mfc42.dll
If you have deleted mfc42.dll from your PC by accident, you can try recovering it from the Recycle Bin. To do that, you can follow these steps:
- Double-click the Recycle Bin icon on your desktop.
- In the Recycle Bin window, scroll down to find the mfc42.dll file from the list.
- Next, right-click it and select Restore.
- Once done, you can recover the file successfully, and then check if the error is fixed.
If you have already emptied your Recycle Bin, you can use a third-party tool to recover the deleted files. Here, I recommend MiniTool Partition Wizard for you. Here are the detailed steps:
Step 1. Download and install MiniTool Partition Wizard on your PC, and then launch it.
MiniTool Partition Wizard DemoClick to Download100%Clean & Safe
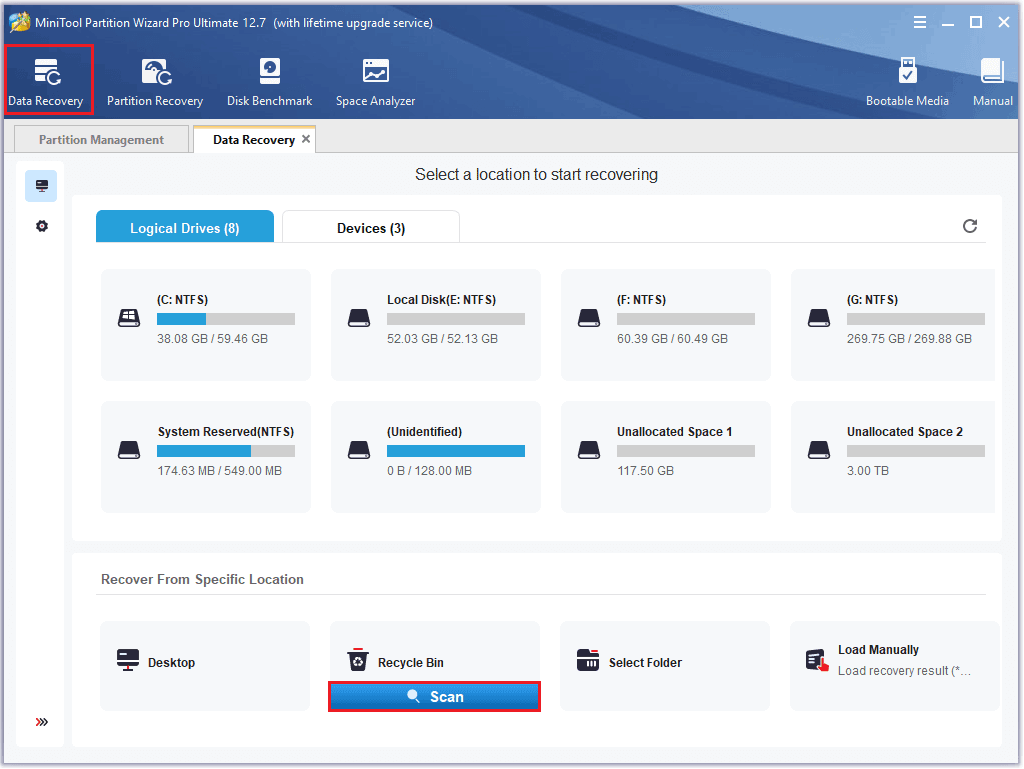
Step 2. Select Data Recovery, move your cursor to Recycle Bin and click the Scan button.
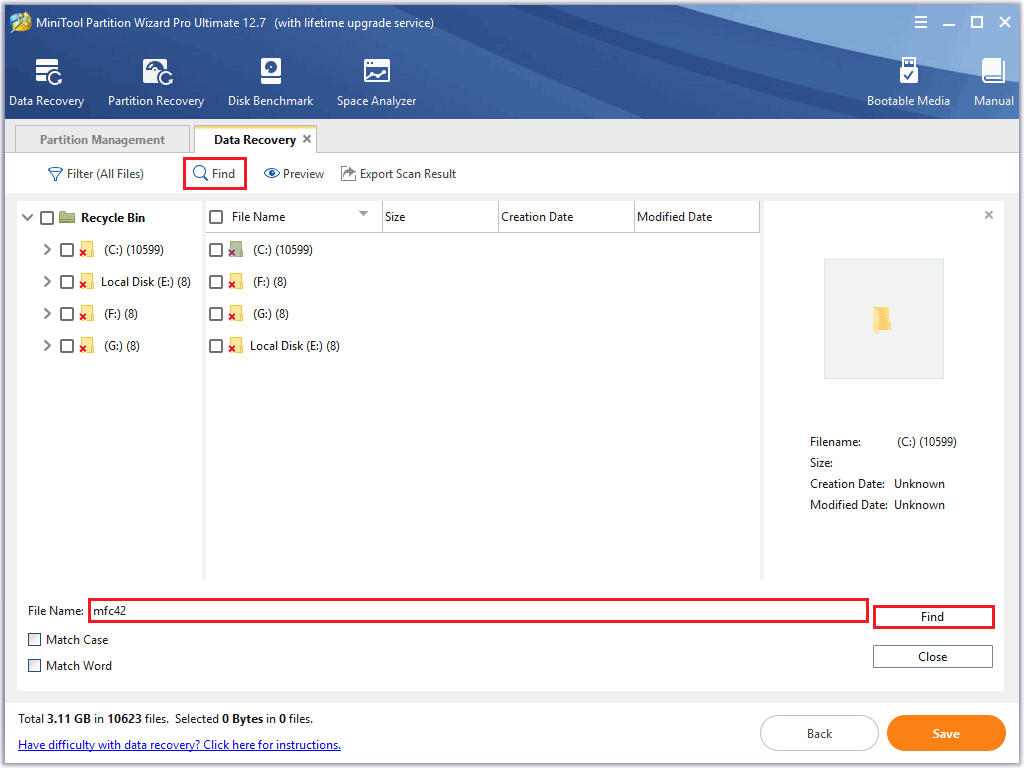
Step 3. After the scanning is done, click Find and then type “mfc42” in the search box. Then click Find.
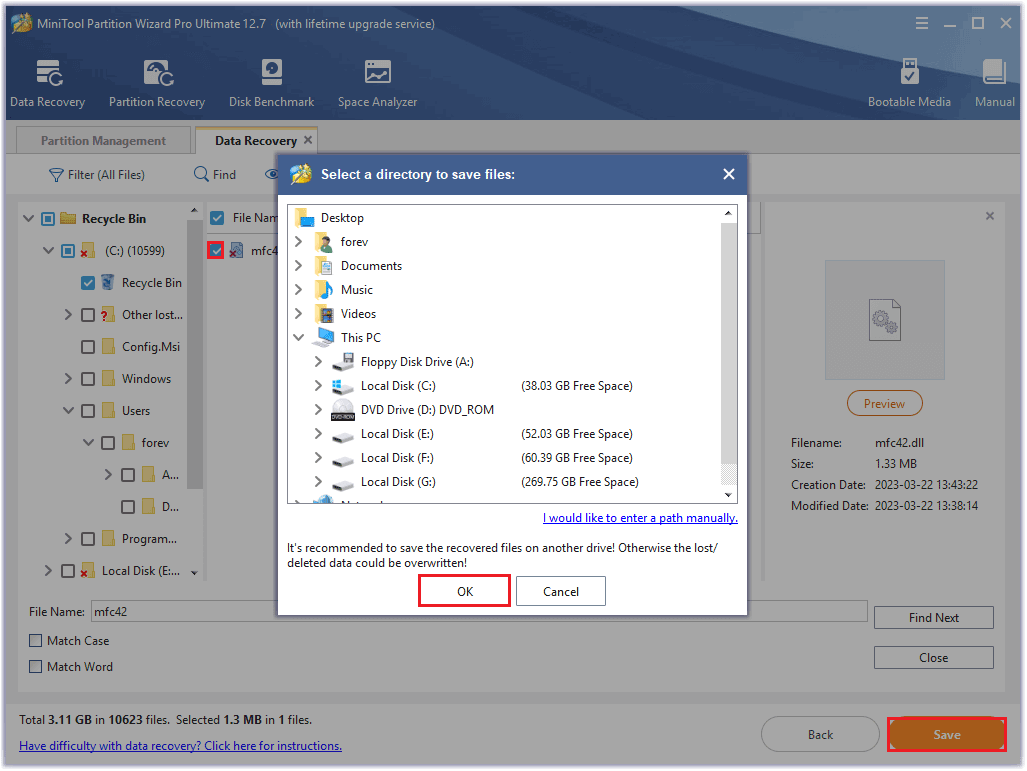
Step 4. Check the file from the search result and click Save. Next, select a directory to save files to and click OK.
Method 2. Update Windows and Graphics Drivers
Outdated Windows and graphics drivers can occasionally cause mfc42dll errors, too. So, if the Windows on your PC is outdated, you can try updating it to the latest version to fix this error.
To do that, you need to go to Settings > Update & Security and click the Check for updates button. If there are any available updates, just click on Download and Install immediately. Once done, restart your PC and check if the error is fixed.
To update graphics drivers, you can follow this guide:
- Press the Windows and R keys at the same time to open the Run window.
- Then type “devmgmt.msc” in the box and press the Enter key.
- Expand the Display adapters category in the newly opened window.
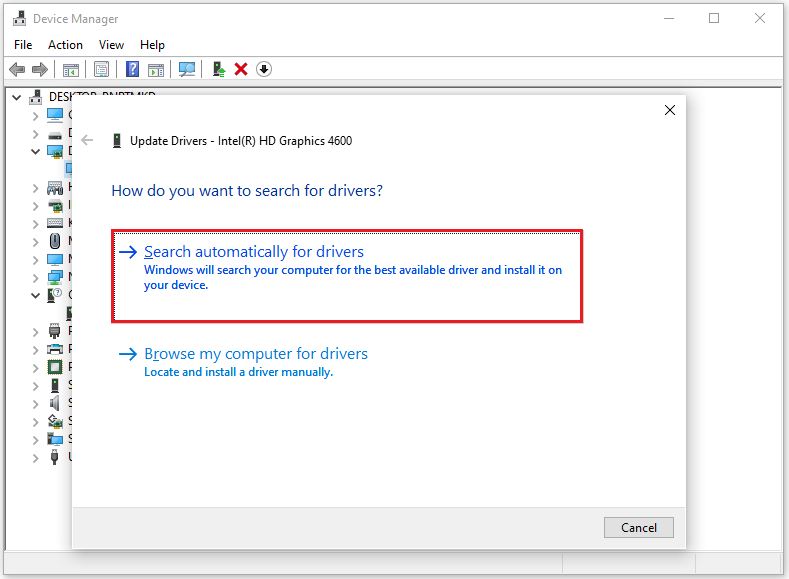
- Right-click the Nvidia driver and then select Update driver from the menu.
- Next, click on Search automatically for drivers in the following window.
- After that, Windows will automatically locate and install the most recent drivers from the Internet.
- Once done, reboot your computer and check if the error is fixed.
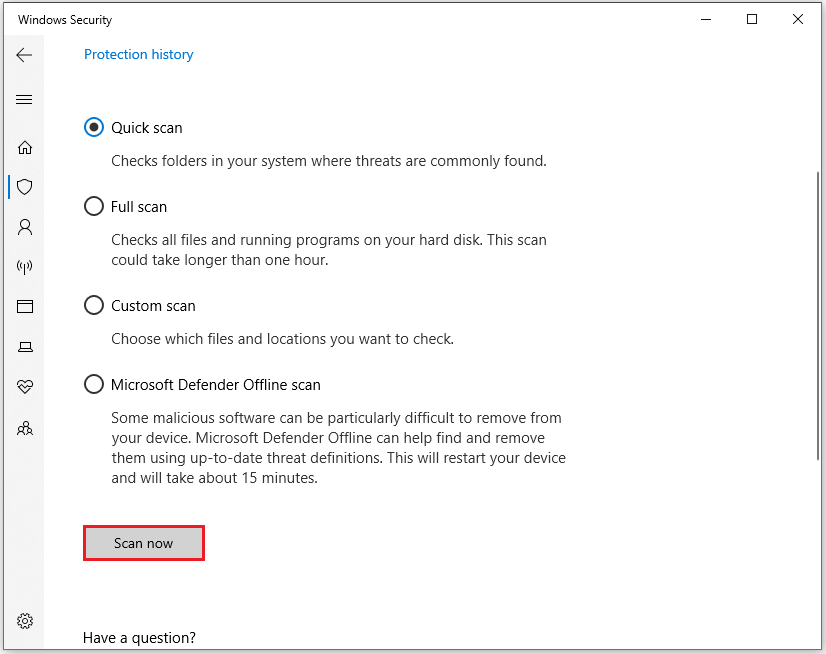
Method 3. Run a Virus/Malware Scan
If there are any viruses or malware on your PC, you may also encounter the “mfc42.dll is missing” or “Mfc.dll not found” error. In this situation, you can run a virus or malware scan to fix this error. Here’s the way:
- Open the Settings window on your PC.
- Go to Update & Security > Windows Security.
- Select the Virus & threat protection option in the right panel.
- Click the Scan options in the new window.
- Select a scan method you like from Quick scan, Full scan, Custom scan, or Microsoft Defender Offline scan. Then click Scan now.
- Once done, check if the error is fixed.
Method 4. Roll Back the Driver
You can try rolling back the driver to fix the error if you encounter the “mfc42.dll is missing” or “mfc42.dll not found” error after you update some of your drivers. Here’s the guide:
- Open the Device Manager
- Expand the category, which includes the driver you have updated before.
- Right-click the driver and select Properties.
- Go to the Driver tab, and then click the Roll Back Driver
- Once done, click OK. Then check if the error is fixed.
Method 5. Run the SFC
You can try running the SFC command to scan and fix the “mfc42.dll is missing” and “mfc42.dll not found” errors, because the sfc /scannow command can check all the critical Windows files and replace any of the problematic files. Here are the detailed steps to run it:
- Open the Command Prompt as administrator.
- Type “sfc /scannow” and press Enter.
- Wait for the process to be completed.
- Once done, restart your PC and check if the error has been resolved.
Method 6. Use Windows Memory Diagnostic to Do a Memory Check
As the memory issue can also cause the “mfc42.dll is missing” and “mfc42.dll not found” errors, you can try running the Windows Memory Diagnostic tool to fix this error. Follow these steps to accomplish this operation:
- Open the Run window.
- Enter “mdsched.exe” into the box and press the Enter key.
- A window will pop up. You can choose the first option Restart now and check for problems (recommended).

You’d better replace the memory module if your hardware fails this test. To do that, you can refer to this post: How To Upgrade Or Replace The RAM On Your Computer
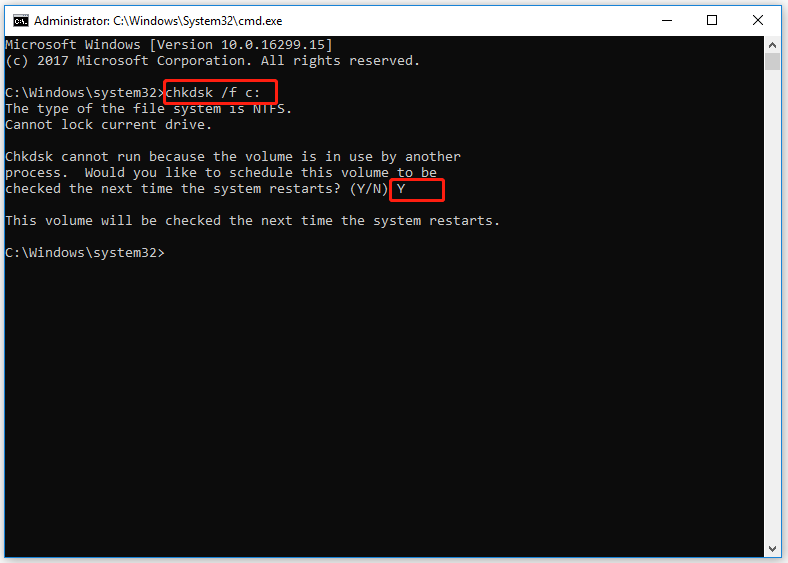
Method 7. Check the Disk on Your PC
If there are some issues with your storage device, you may also encounter the mfc42dll error. To fix that, you can run CHKDSK. Here’re the detailed steps:
- Press the Window and S keys simultaneously to open the Search window, and then type “cmd” in the search box.
- Next, you can see Command Prompt under Best Match.
- Choose Run as administrator from the right panel.
- Type the command “chkdsk /f c:” and press the Enter key.
- After that, you can see a sentence that asks if you’d like to check this volume next time the system restarts. Then you just need to type Y and press the Enter key.
- Once done, restart your PC after closing Command Prompt.
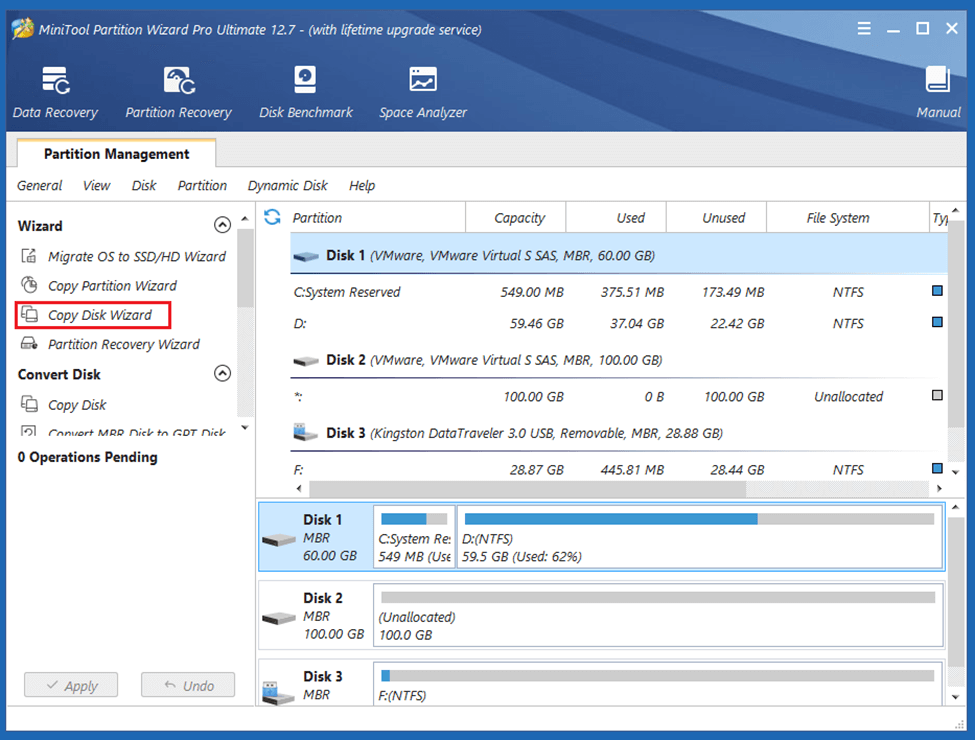
If your hard drive fails the test, you’d better replace the hard drive as soon as possible. Before doing that, you can clone all your data via MiniTool Partition Wizard to the new hard drive first, or you may lose your data. Here’s how to do it:
MiniTool Partition Wizard DemoClick to Download100%Clean & Safe
Part 1. Create a Bootable USB Drive
- Install MiniTool Partition Wizard on your PC. Connect your USB drive to this computer, and then launch MiniTool Partition Wizard.
- Click the Bootable Media feature on the top, and then click WinPE-based media with MiniTool plug-in.
- Select USB Flash Disk and click Yes in the pop-up window. Once done, you can create the bootable USB drive successfully.
Part 2. Clone Data to the New Hard Drive
Step 1. Connect the created bootable media to your computer and then boot the device from it.
Step 2. Then follow the on-screen instructions to launch MiniTool Partition Wizard.
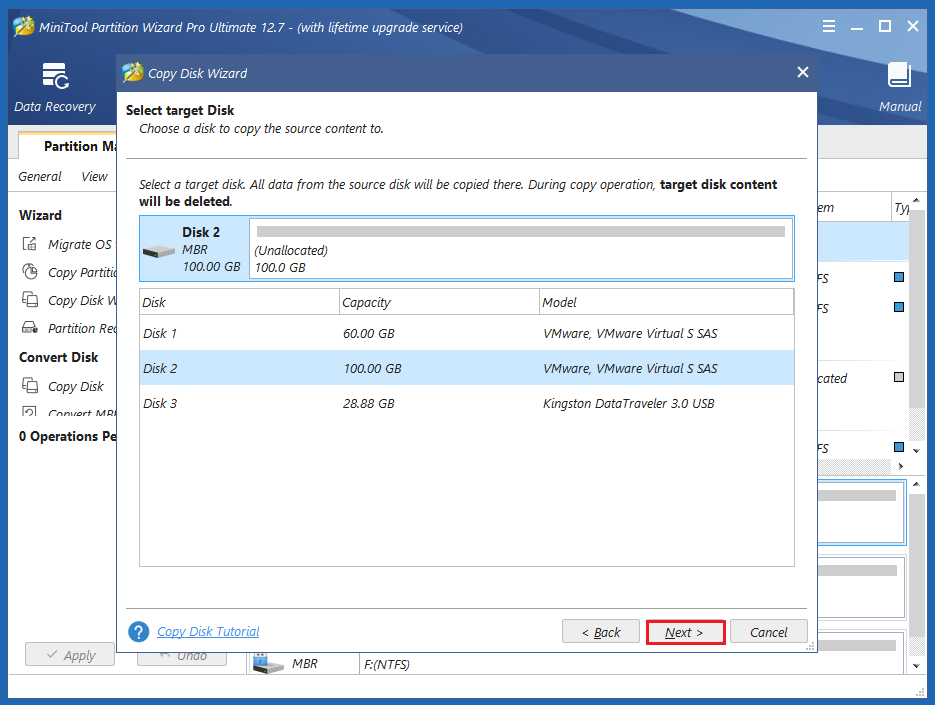
Step 3. Next, connect an external hard drive to your computer and select Copy Disk Wizard from the left panel.
Step 4. Then you will go to the Select Disk to Copy window. Select system disk and then click Next.
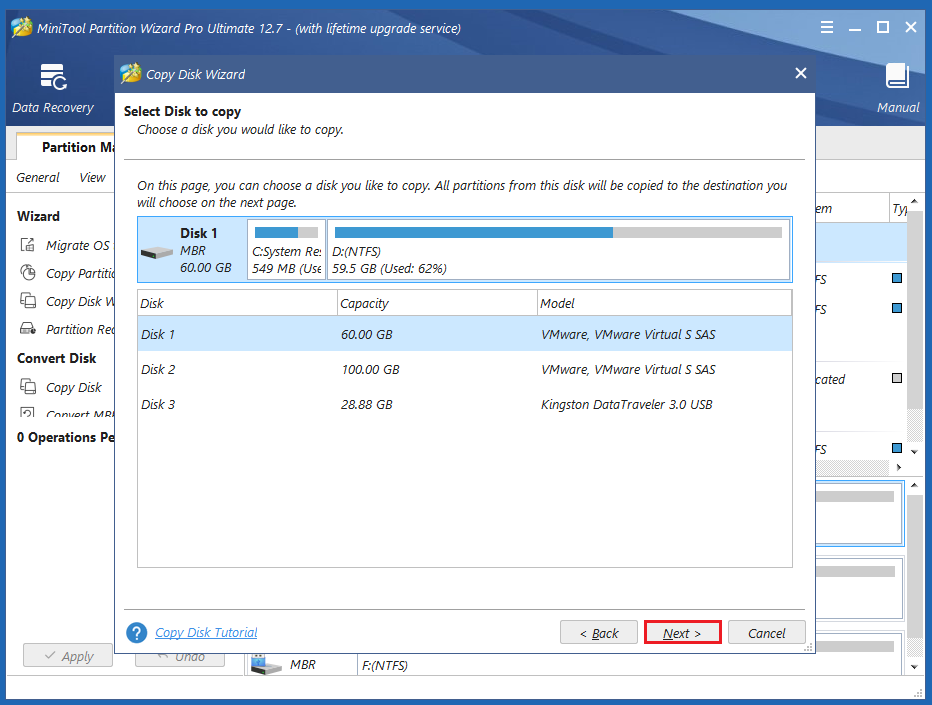
Step 5. Next, select the destination disk (Disk 2) and click the Next button. In the prompted window, click Yes if there are no important data on it.
Step 6. Select copy options based on your needs and click Next. Click the Finish button on the next window.
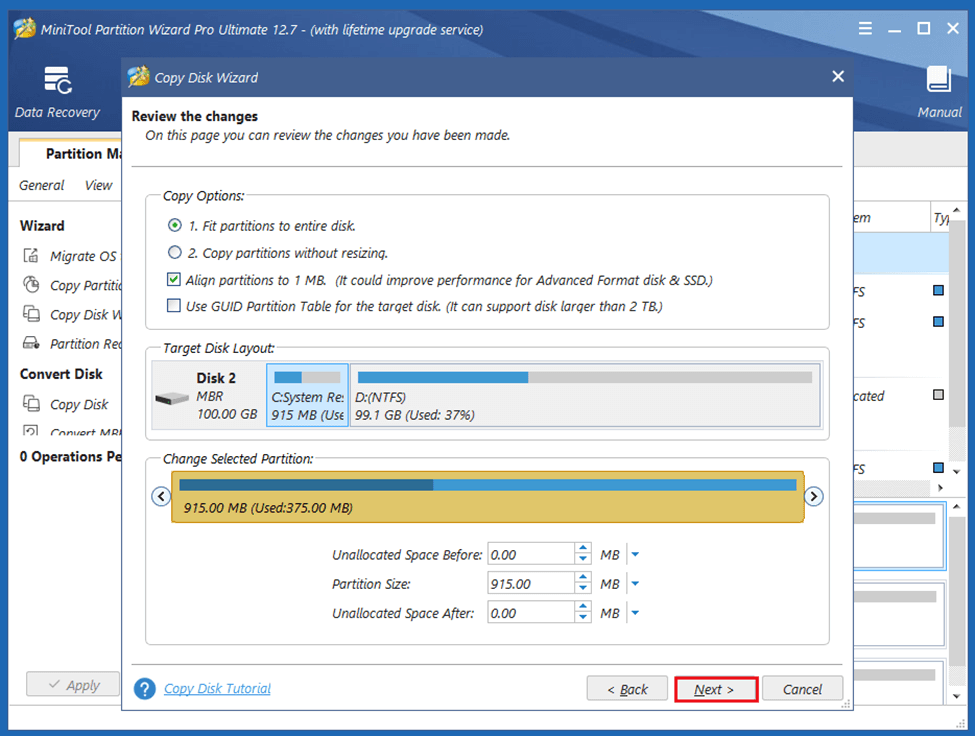
Step 7. Click Apply and Yes to execute your changes.
Method 8. Perform System Restore
Changing an important file or configuration may also cause the “mfc42.dll is missing” or “mfc42.dll not found” error on your PC. In this case, you can perform a system restore to undo the changes you’ve made. Here’s the way:
- Open the Settings
- Go to System > About, and then select the System protection link on the right panel.
- In the new window, click the System Restore
- Select Next, and then select the restore point you want to use from the list.
- After that, click the Next
- Next, click Finish. Then choose Yes to the “Once started, System Restore cannot be interrupted. Do you want to continue?” question.
- Then the System Restore process will begin. Wait for this process to be completed.
- Once done, your Windows will revert to the previous state as you select.
Method 9. Reinstall the Program that Uses the Mfc42.Dll File
If the mfc42.dll file is included in a certain program, reinstall the program once the mfc42.dll missing issue occurs. By doing so, the missing mfc42.dll will be replaced. If the file isn’t missing, this operation will reassociate it with the DLL file. So, you can also have a try.
Method 10. Repair Your Installation of Windows
You can also try using Startup Repair to fix this mfc42dll error on your PC. Startup Repair is a built-in tool of Windows that can scan your computer for system issues (corrupt system files, invalid boot files), then try to fix the problem. Here are the detailed steps for using it:
- Enter the Windows Recovery Environment.
- Navigate to Troubleshoot > Advanced options > Startup Repair.
- Then the Windows 10 Startup Repair tool will automatically diagnose and fix the computer problems.
Method 11. Perform a Clean Installation of Windows
If all the above methods are unable to help you fix the mfc42dll error, you can try performing a clean installation of Windows to fix this error. You can refer to these posts according to your needs:
- How to Clean Install Windows 10 22H2 (the 2022 Update) from USB?
- [Illustrated Guide] How to Clean Install Windows 10 21H2 on PC?
- [Illustrated Guide] How to Clean Install Windows 10 21H1 on PC?
- How to Clean Install Windows 11 22H2 (2022 Update)
- How to Clean Install Windows 8.1 on Your Computer?
Bottom Line
This post provides the possible factors that can cause the mfc42dll error and 11 fixes to help you fix it. You can try these fixes on your own to resolve this error.
Do you know other methods to solve this error? Please share your ideas or experiences with us in the following comment zone. In addition, if you encounter problems while using MiniTool Partition Wizard, please contact us via [email protected]. We will get back to you as soon as possible.
About The Author

Position: Columnist
Charlotte is a technology columnist with a strong focus on the Windows operating system, specializing in disk management, backup, and data recovery. She is passionate about analyzing computer errors, identifying root causes, and delivering practical solutions. In her free time, she stays updated on the latest developments in computer systems and hardware while continuously learning new technologies to broaden her expertise. Her writing style is clear and easy to understand, making complex technical topics accessible even to users with limited computer knowledge.
User Comments :