There are still some users who deal with their digital data using IDE hard drive which is slower and with lower performance than SATA hard drive. If you are one of them, you might need to upgrade your IDE to SATA HDD/SSD. In this post, MiniTool introduces a tutorial with detailed steps to help you upgrade IDE to SATA disk without reinstalling operating system.
Why to Upgrade IDE to SATA
IDE and SATA are different types of interfaces to connect storage devices to a computer’s system bus. If you are wondering whether you should upgrade your old IDE hard drive to SATA HDD/SSD, you’d better know the differences between IDE and SATA hard drive.
IDE is an interface technology created in 1986. Generally speaking, IDE hard drive has the following features:
- It offers low data transfer rate (up to 133 MB/s).
- It doesn’t support hot plugging.
- It doesn’t support the latest Windows system such as Windows 10/8.
- It needs jumper settings while installing. If it’s set wrongly, your IDE hard drive would be unrecognized by the computer.
Compared to IDE hard drive, SATA hard drive which is introduced in 2003 has superior features as follows:
- It provides high data transfer rate (up to 6 GB/s).
- It supports hot plugging.
- It usually comes with large capacity.
- It reduces power consumption.
- It can be connected to the computer directly.
In conclusion, you can get three benefits by upgrading your IDE to SATA hard drive:
- Faster data transferring speed and higher performance.
- Better compatibility with operating system.
- Easier connection.
If you need to complete some advanced tests, store more data on your hard drive or find that your computer runs quite slowly with an IDE hard drive, don’t hesitate anymore. Let’s see how to upgrade your IDE to SATA hard drive now.
How to Upgrade IDE to SATA
For a hard drive you have used for a long time, you can’t just simply replace it with a new one because there are a lot of useful data in it. If you want to upgrade your hard drive and keep all the data, you need to use third-party software to help you. MiniTool Partition Wizard is a reliable one.
With this assistant, you can clone your entire IDE hard drive to SATA HDD/SSD. And you can boot your computer from the cloned SATA hard drive without reinstalling the operating system. In the following contents, you can learn about the detailed steps for cloning IDE to SATA hard drive.
4 Moves to Clone IDE to SATA
- Initialize the new SATA hard drive.
- Set the SATA hard drive to IDE mode in BIOS.
- Copy all the data in IDE to SATA hard drive.
- Boot from the SATA hard drive
Move 1: Initialize Your New SATA Hard Drive
If your SATA HDD/SDD is new, you need to initialize it at first. If it has been used already, you can ignore this move and just jump to the next move.
Here is how to initialize the hard drive.
Step 1: Connect your SATA hard drive to the computer via the SATA cable and power cable or a SATA to IDE adapter.
Step 2: Press Win + R to invoke Run window. Then input diskmgmt.msc in the box and click OK to open Disk Management.
Step 3: Right-click your SATA hard drive in Disk Management and select Initialize Disk.
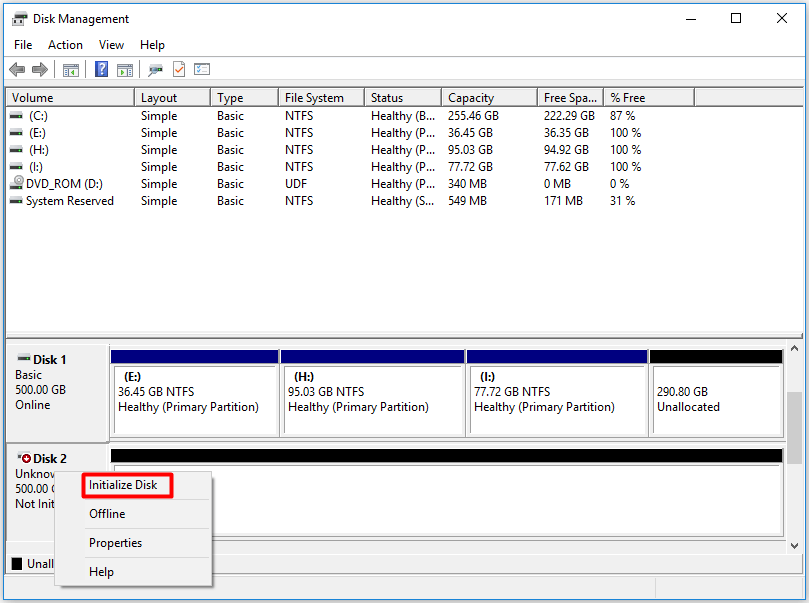
Step 4: In the pop-up window, you can choose to initialize the hard drive as MBR (Master Boot Record) or GPT (GUID Partition Table) according to your needs. Then click OK and follow the onscreen instructions to finish the process.
Then you can go to the next move.
Move 2: Set the SATA Hard Drive to IDE Mode in BIOS
If you want to clone IDE to SATA hard drive without any booting issues, you need to change some BIOS settings before cloning. You just need to follow the steps below.
Step 1: Connect the SATA hard drive to your computer.
Step 2: Restart your computer and press F12 or Delete key when the manufacturer’s logo appears to enter BIOS.
Step 3: Go to Main menu and select IDE mode for Configure SATA as option.
Step 4: Save the changes you have made and exit BIOS.
Now you can boot your computer again and follow the next move to start the cloning process.
Move 3: Copy All the Data in IDE to SATA Hard Drive
Once you have initialized your new SATA hard drive and changed BIOS settings successfully, you can download the cloning assistant, MiniTool Partition Wizard, and start to clone IDE to SATA hard drive.
Step 1: Click the following button to download and install MiniTool Partition Wizard.
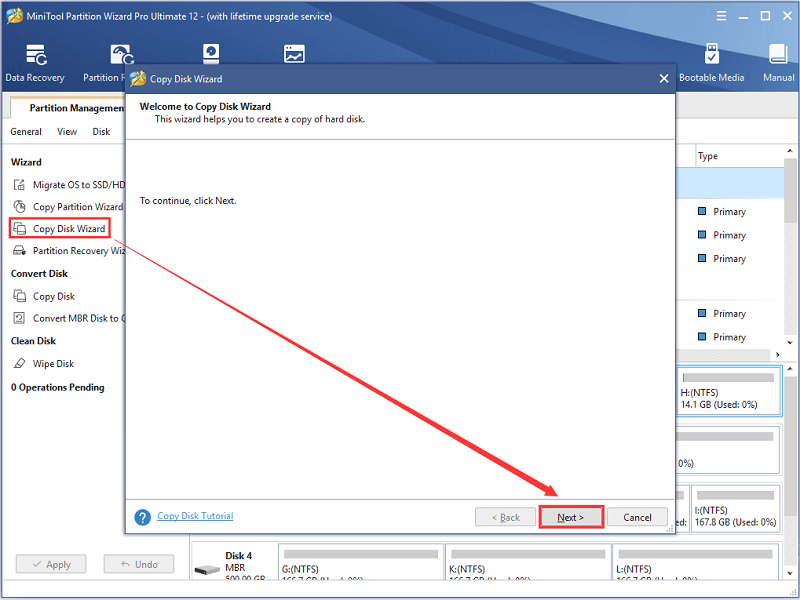
Step 2: Launch the software and click Copy Disk Wizard from the action panel on the left side. Then a welcome window will pop up, and you just need to click Next to continue.
Step 3: In the following window, select your IDE hard drive to copy and click Next.
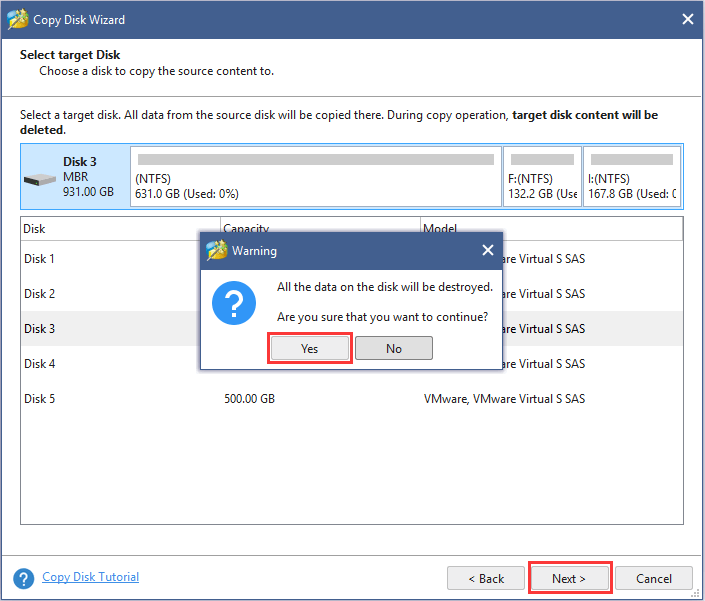
Step 4: Choose your SATA hard drive as the target disk to store the copied content. Then click Next. In the pop-up window, select Yes to confirm the operation.
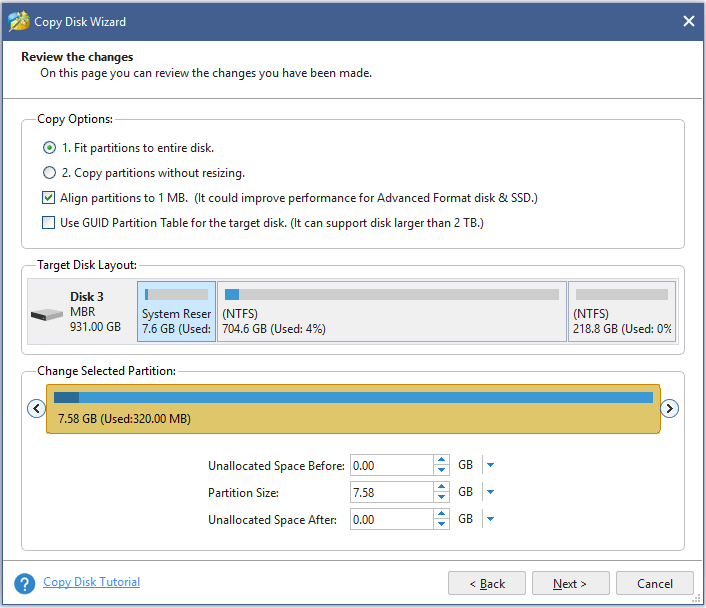
Step 5: Configure the partition options and then click Next. There are some instructions for you if you don’t know how to select partition options:
- Choose one option from Fit partitions to entire disk (your SATA disk partition size will be adjusted automatically according to its storage to fill the whole disk) and Copy partitions without resizing (the partition size will be the same as your IDE hard drive). Usually we choose the former one.
- Align partitions to 1 MB option is used to improve the performance of SSD. If your SATA hard drive is an SSD, you can check this option.
- You can check Use GUID Partition Table for the target disk if you want to copy your IDE disk to SATA hard drive with GPT type.
- If you are not satisfied with the partition size, you can select the partition and change the layout manually.
Step 6: Read the note that tells you how to boot from the destination disk and then click Finish.
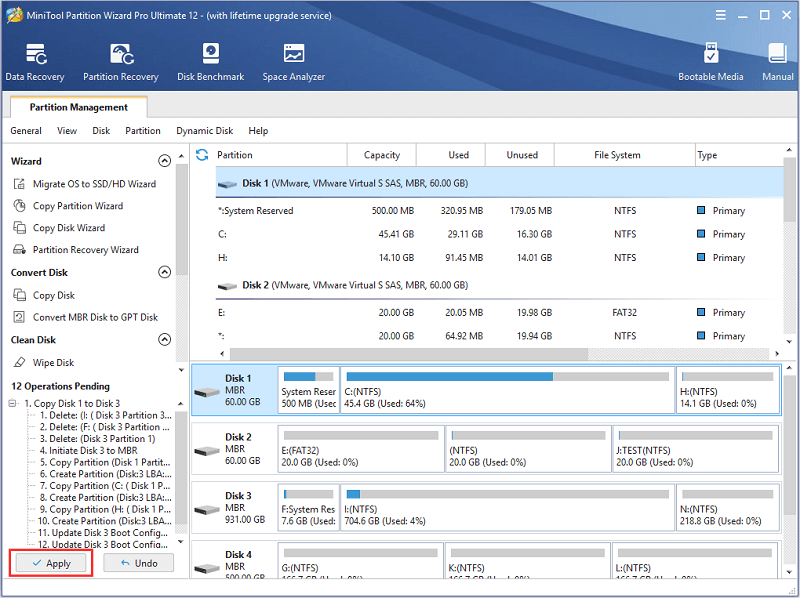
Step 7: Check the pending operations in the action panel and make sure that you’re copying IDE to SATA hard drive. Then click Apply to execute the pending operations.
Now you have cloned all the data in IDE to SATA hard drive. Then you can follow the last move to set the boot order in BIOS.
Move 4: Boot from the SATA Hard Drive
If you want to use the cloned SATA hard drive as the system disk and boot your computer from the drive, you need to change the boot settings in BIOS.
Step 1: Enter BIOS with the same steps listed in Move 2.
Step 2: Navigate to Boot menu. Then select your SATA hard drive as the first drive to boot from it.
Step 3: Save and exit BIOS.
Then you can start your computer and the Windows will boot from your SATA hard drive. For the old IDE disk, you can delete all the data on it and use it as a storage device, or you can wipe the disk and then sell it or destroy it.
Further Tip: Migrate OS from IDE to SATA Hard Drive
If you don’t need the data in your old IDE hard drive, it may be a waste of time to clone the entire disk, and it’s also a waste of your SATA storage space. In this case, you can only migrate the system partition from IDE to SATA hard drive to upgrade your hard drive without reinstalling the operating system in Move 3.
You can also use MiniTool Partition Wizard to make it.
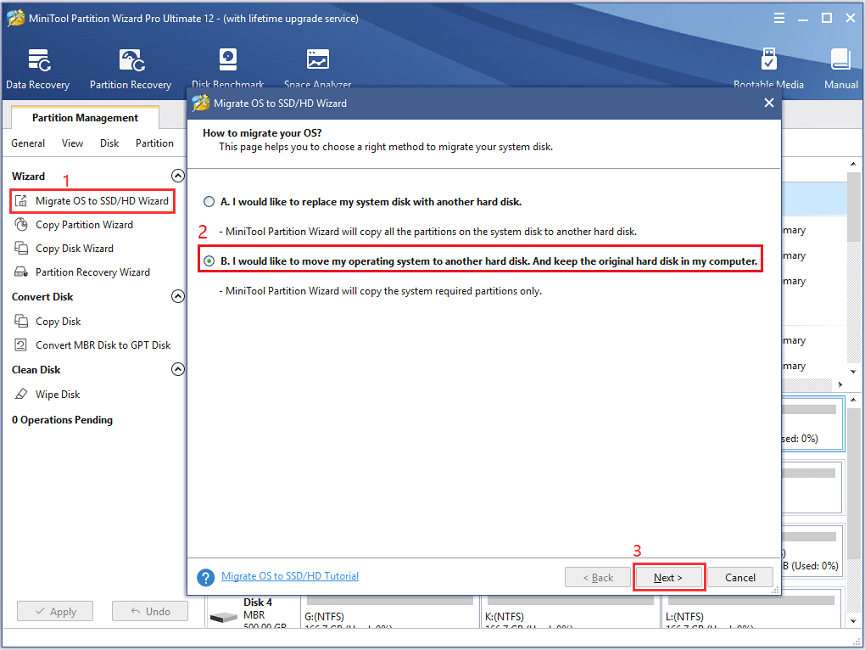
Step 1: Launch MiniTool Partition Wizard. When you get into the interface, click Migrate OS to SSD/HD Wizard from the action panels.
Step 2: Select option B to migrate your operating system only and click Next to continue.
Step 3: Choose your SATA hard drive as the destination disk and then follow the wizard to finish the operation.
Step 4: When you go back to the interface, click Apply to execute all the pending operations.
After the operations are applied, you can follow Move 4 to set your computer boot from the SATA hard drive.
Bottom Line
This post introduces the detailed steps about how to upgrade your IDE to SATA hard drive. It’s kind of complicated but you can make it as long as you follow the 4 moves above one by one.
You can leave a message in the following comment section if you have any questions or advice. For any problems about MiniTool Partition Wizard, please don’t hesitate to send us an email via [email protected].
IDE to SATA FAQ
If you have upgraded your old IDE to SATA hard drive, here are some suggestions about how to deal with your old IDE hard drive:
- Use it as a new storage device or backup device.
- Wipe the information on it and then sell it or throw it away.
- Destroy it.
User Comments :