Many Windows users report that they encountered various error codes in Windows Update. In this post, MiniTool Partition Wizard introduces one of the Windows Update errors, 0x80244007. If you’re bothered by the same problem, you can refer to these fixes to solve it.
About Error 0x80244007
Windows Update is a Microsoft service for Windows 9x and Windows NT families of operating system. It automates downloading and installing Microsoft Windows software updates over the Internet.
Unfortunately, some user encountered problems while trying to downloading or installing a certain update. Error 0x80244007 is a common one. Here is the report from a Windows user:
I cannot run Windows Update on my Window 10 machine. It fails with error code 0x80244007. Last successful update was 1 month ago. Please help!– answers.microsoft.com
As the user says, people who encounter this error will be unable to update Windows. And this error usually comes with the following message:
There were some problems installing updates, but we’ll try again later. If you keep seeing this and want to search the web or contact support for information, this may help (0x80244007).
It’s common to see the error on Windows 10, and a few Windows 8.1 users also report it. Why does this error appear? Here are some possible reasons:
- Junk files
- WU (Windows Update) system file inconsistency
- System file corruption
- Third-party antivirus interference
If you are also looking for the solutions to this error, keep reading and try the following fixes.
Fix 1: Run Windows Update Troubleshooter
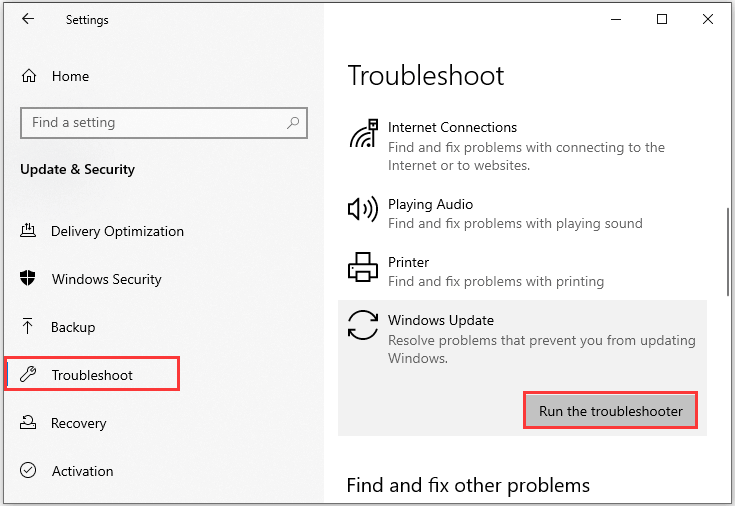
An easy way to troubleshoot Windows Update issues is to run the built-in Windows Update Troubleshooter, a utility that can diagnose and resolve common problems with Windows Update. Here is how to fix Windows Update error 0x80244007 with this tool on Windows 10.
Step 1: Press Win + I to open Windows Settings.
Step 2: Click Update & Security.
Step 3: In the left pane, select Troubleshoot. In the right pane, scroll down to find Get up and running section. Then click Windows Update and select Run the troubleshooter.
Then Windows will detect problems automatically. You just need to wait patiently and follow the onscreen instructions to finish the operation.
Once it’s done, you can restart your computer and check for updates again. If you still encounter download error 0x80244007, move on to the next solution.
Fix 2: Delete Junk Files with Disk Cleanup
If Windows Update Troubleshooter doesn’t help you remove the error message “There were some problems installing updates”, you should try running Disk Cleanup tool to clear all temporary files or junk files, including browser cache and cookies.
Here are the detailed steps.
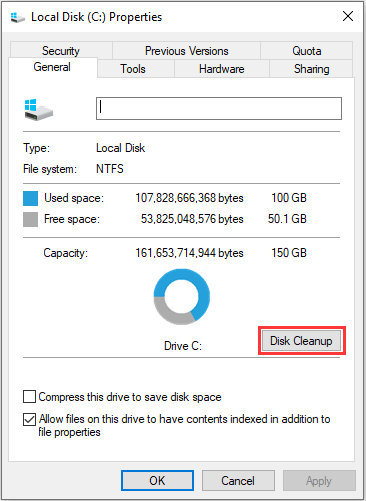
Step 1: Press Win + E to open File Explorer.
Step 2: Select This PC. Then right-click your system drive and select Properties.
Step 3: In the pop-up window, click Disk Cleanup button. Then Disk Cleanup will calculate how much space you will be able to free. This might take a few minutes to complete and you need to wait patiently.
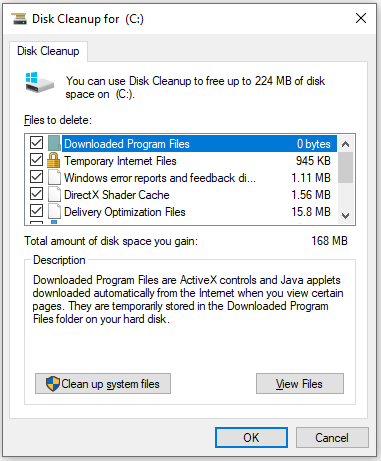
Step 4: Now, you can see how much disk space you can get by deleting all files in the list. Check the files you want to delete and click OK to delete them.
After clearing temporary or junk files, you can try installing the update and check if error 0x80244007 disappears.
Fix 3: Reset Windows Update Components
The WU system file inconsistency is another factor that might stop your computer form installing updates with the error 0x80244007. In this case, you can reset all Windows components and dependencies that are involved in the process to solve the problem. If multiple updates are failing with the same error code, this method is quite applicable.
The detailed steps are listed below.
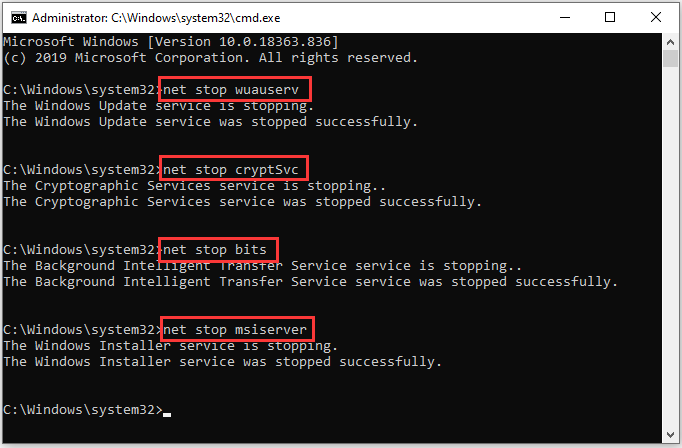
Step 1: Press Win + R to invoke Run window. Then type cmd in the box and press Shift + Ctrl + Enter to run Command prompt as administrator.
Step 2: In Command Prompt, input the following commands and press Enter after each to stop Windows Update, Cryptographic and BITS services, and the MSI Installer:
- net stop wuauserv
- net stop cryptSvc
- net stop bits
- net stop msiserver
Step 3: Input the commands below and press Enter after each to rename the folders responsible for storing temporary Windows Update files:
- ren C:WindowsSoftwareDistribution SoftwareDistribution.old
- ren C:WindowsSystem32catroot2 Catroot2.old
Step 4: Execute the following commands to re-enable the services that you have disabled in Step 2. Remember to press Enter after each command.
- net start wuauserv
- net start cryptSvc
- net start bits
- net start msiserver
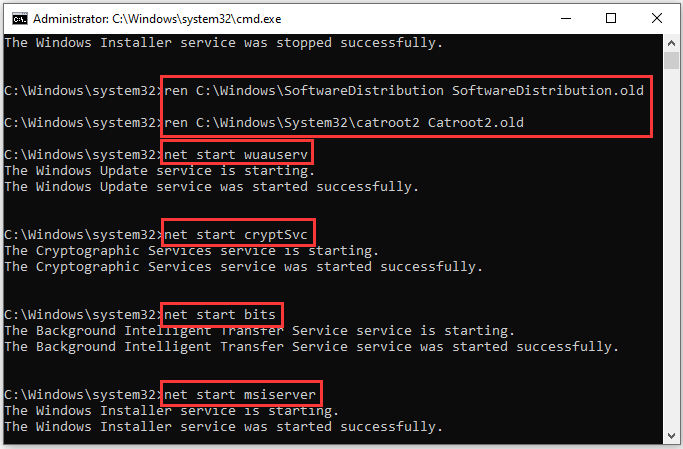
Once it’s completed, you can try installing the update that fails due to error 0x80244007, and the problem should have been solved.
Fix 4: Run DISM and SFC Scan
Corrupted system files could also lead to Windows Update error 0x80244007. DISM (Deployment Image Servicing and Management) and SFC (System File Checker) are both helpful to solve the problem.
These utilities fix corrupted items in different ways. DISM uses a sub-component of WU to replace corrupted items with healthy copies, while SFC makes use of locally stored copies to fix them. Here, you’re recommended to run both of them to fix download error 0x80244007.
You can follow the steps below.
Step 1: Run Command Prompt as administrator.
Step 2: Type the following commands and press Enter after each to start a DISM scan:
- dism.exe /online /cleanup-image /scanhealth
- dism.exe /online /cleanup-image /restorehealth
Step 3: After the DISM scan, exit Command Prompt and restart your computer. Then, run Command Prompt as administrator again and type the command sfc /scannow. Press Enter to execute it.
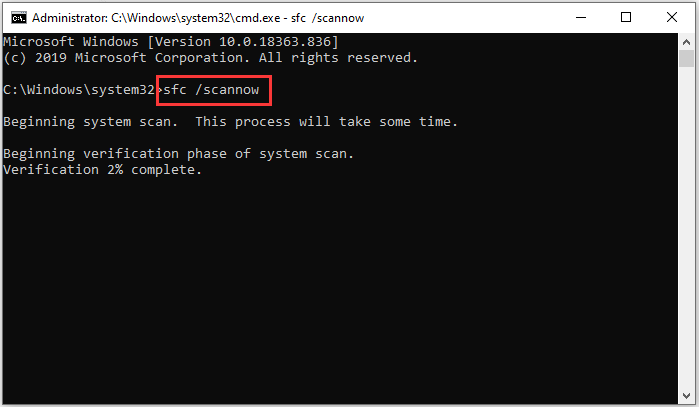
Wait until the process is finished. Then you can reboot your computer and check if the error is fixed.
Fix 5: Uninstall Third-party Antivirus
According to the report, some third-party antivirus software might also cause Windows Update error 0x80244007.
Although antivirus protect your computer from being attacked by virus or malware, they could also block the connection between the Windows Update components and the external server. That’s why you see the message “There were some problems installing updates, but we’ll try again later”.
If you were using any antivirus applications while installing Windows updates, you’d better try disabling the real-time protection temporarily. The detailed steps might be different depending on the software you’re using. In most cases, you can right-click the antivirus icon from the taskbar and look for the option of disabling the real-time protection temporarily.
If this doesn’t work, you can uninstall the antivirus and delete any remnant files completely. Then restart your computer and check if the error has been removed. If you’re going to do this, follow the steps below.
Step 1: Press Win + S to open Search utility. Then input control in the search box and click Control Panel from the search results.
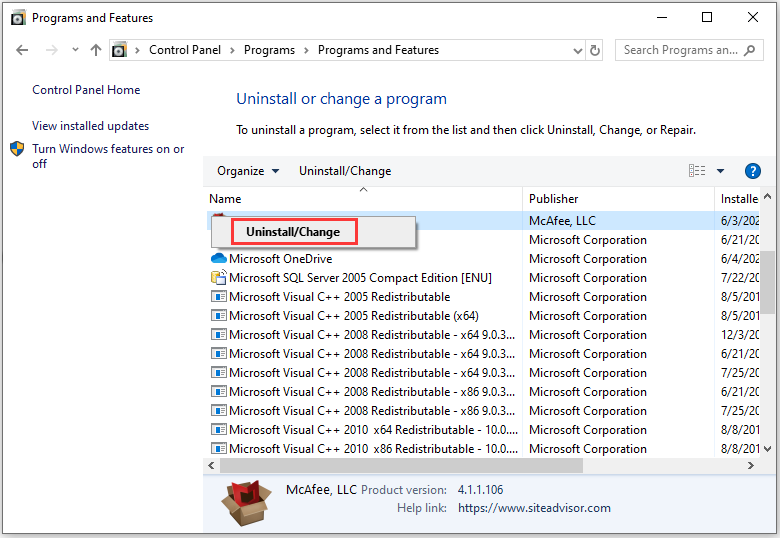
Step 2: In the pop-up window, select View by: Category and then click Uninstall a program to view the list of Programs and Features.
Step 3: Right-click your antivirus software and select Uninstall or Uninstall/Change. Then follow the onscreen instructions to finish the left steps.
Step 4: Remove remnants of the uninstalled antivirus software. If you’re not sure how to do it, refer to this post.
Then you can restart your computer and install the updates again. For the safety, remember to re-enable the real-time protection or install another reliable antivirus after you solve the problem.
Fix 6: Preform a Clean Install
If all the fixes above fail to solve Windows Update error 0x80244007, it is possible that you are dealing with an underlying system file corruption that cannot be fixed with ordinary recovery procedures.
The last thing you can try is to perform a clean install of operating system to reset every Windows component. You need to pay attention that this will delete most of your files including app & game installation, user preferences and your personal files on the system drive. So, you’d better back them up before you start to reinstall Windows.
Let’s see more details.
Move 1: Back up Your System Drive
By clean installing the OS, you can get a fresh system without any hidden corruption or problems. It indicates that you will lose everything on your system partition.
So, you should back up the system drive with a reliable third-party program at first. MiniTool Partition Wizard, a wonderful disk manager, is recommended here. With the help of its Copy Partition feature, you can perform a clean install without any worries about data loss.
Step 1: Connect an external hard drive that can store all the data on your system drive to your computer.
Step 2: Download and install MiniTool Partition Wizard by clicking the following button. Then launch it and register to the Pro Ultimate Edition.
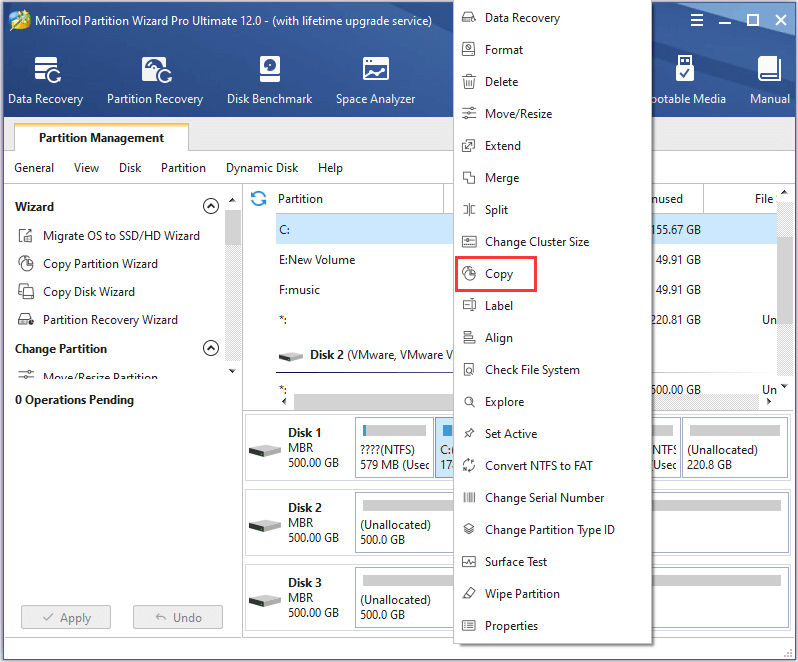
Step 3: When you get the main interface, right-click your system drive and select Copy.
Step 4: Choose an unallocated space from the partition list of your external hard drive to save the copy and then click Next.
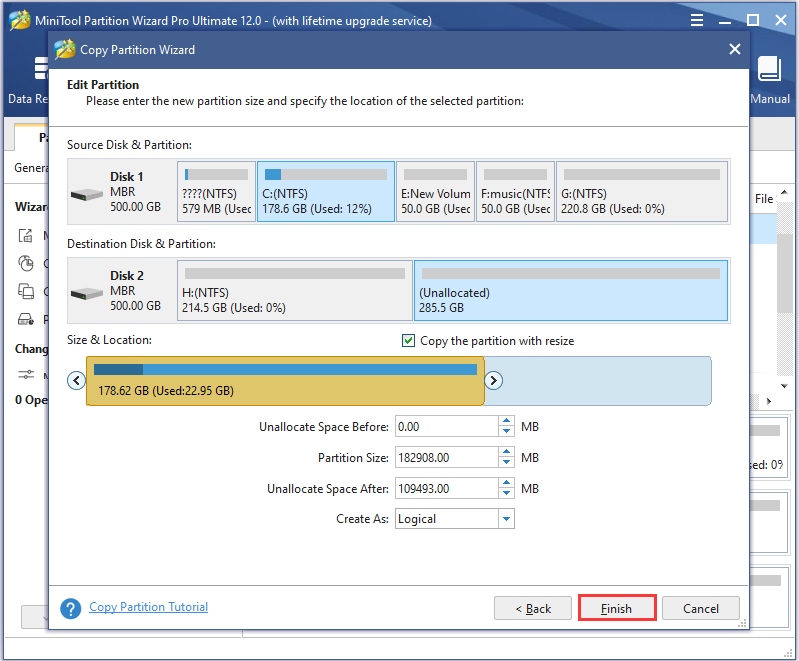
Step 5: Configure the Size & Location of the new partition and click Finish.
Step 6: When you go back to the main interface, click Apply to execute the pending operations. Then MiniTool Partition Wizard will require a restart to perform the copy, as the system disk is being used now. Just click Restart and wait until the process is completed.
After backing up your system drive, you can follow the next Move to reinstall OS.
Move 2: Reinstall OS
Before you perform a clean install to fix error 0x80244007, you should remove all unnecessary peripherals, such as card reader, earphone and external hard drive, etc. Then you can prepare a Windows installation USB drive or CD/DVD disc. If you don’t have such a thing, you can use Windows 10 Media Creation Tool to create one. Then follow the steps below.
Step 1: Connect the Windows Installation Media to your computer and boot from it by setting the bootable media as the first boot device in BIOS.
Step 2: In the following screen, select your language and other preferences. Then click Next to continue.
Step 3: Click Install now. Then follow the onscreen instructions to finish the setup configurations.
When it’s completed, your PC will restart and you just need to log in with your account. Then you should be able to update Windows without any problems.
Bottom Line
Windows Update errors are very common to see. This post introduces one of them, error 0x80244007. And there are 6 fixes to solve this error listed in the contents above. If you are bothered by the same problem and looking for the solutions, try them in order. Hope they are helpful for your case.
You are welcome to leave your ideas in the following comment zone. And for any questions about MiniTool Partition Wizard, please don’t hesitate to contact the support via [email protected].
User Comments :