As we know, hard disk is the main storage media for computers. However, after purchasing a new hard disk or using a disk for a period of time, you may find some hard drive space is missing without knowing the exact reason. Are you troubled by the same issue?
If the answer is yes, you are lucky, because from this post you’ll find 6 possible causes for this issue as well as corresponding solutions.
Now, let’s start explaining causes and solutions one by one.
Case 1. Hard Disk Manufacturers Does not Give Capacity They Promise
On the market there are different capacities of hard disk, including 500GB, 1T, 2TB, and so on. However, when checking capacity of the newly bought hard disk in Windows Disk Management or by adding space of each drive, we may find the real disk size is always dozens of GB smaller than that manufacturers advertise. What’s the reason?
Here, we take 1TB hard disk for example. The following thumbnail shows a 931GB hard disk capacity rather than advertised 1TB:
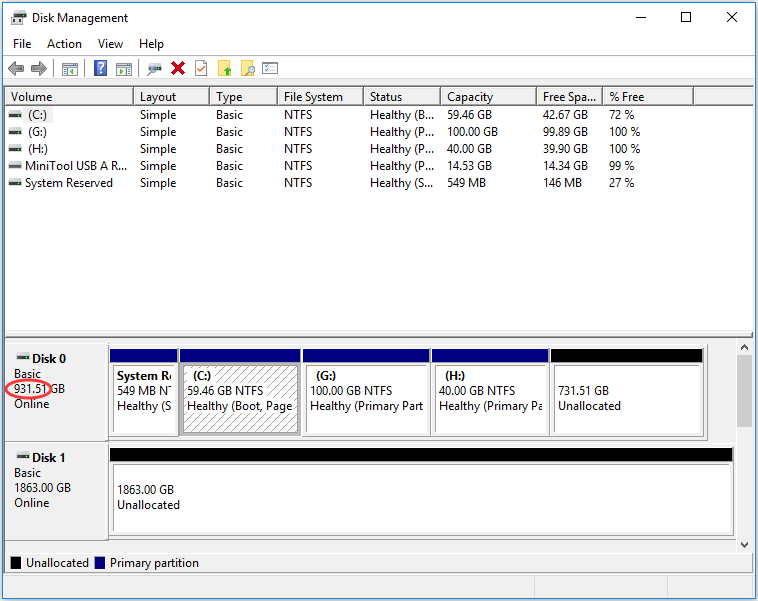
How does this happen?
The fact is that for hard disk manufacturers 1 GB = 1000 MB, 1 MB = 1000 KB, and 1KB = 1000 B (byte), but actually 1 GB = 1024 MB, 1 MB = 1024 KB, and 1 KB = 1024 B.
Therefore a 500 GB hard disk is just (500 * 1000 * 1000 * 1000) 500,000,000,000 B for manufacturers. Converted to GB, it is 5000,000,000,000/1024/1024/1024 ≈ 465GB. Similarly, a 1TB hard disk will be 931GB. This is the cause. Under this situation, we have nothing to do for the missing disk space.
Case 2. Hidden Partitions Take up Space
Laptops are always coming with hidden partitions, such as OEM partition, recovery partition, and Microsoft reserved partition.
Recommended: Are you interested in strange partitions, like OEM partition, recovery partition, and EFI system partition, on laptops? Get to Know Strange Partitions on Laptops in a Fast Way!
In addition, if we install Windows 7, Windows 8, Windows 10, Windows Server 2008, or Windows Server 2012 on a never used hard disk, hidden partitions will also be created by default, including EFI system partition for UEFI and system reserved partition for Legacy BIOS.
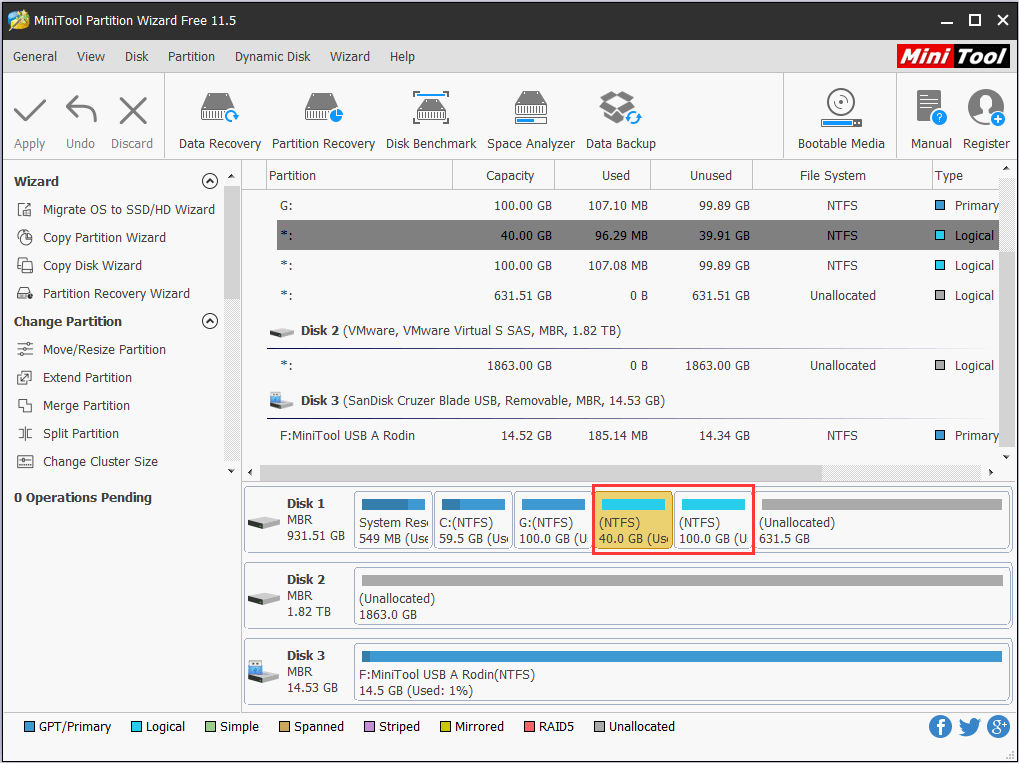
All these hidden partitions will not be shown in Windows Explorer, and Disk Management does not give an option to browse contents of these partitions. On the contrary, MiniTool Partition Wizard, which is a free but competent partition program, not only shows us all hidden partitions but offers a feature to view contents of these hidden partitions. That is Explore Partition.
MiniTool Partition Wizard FreeClick to Download100%Clean & Safe
After successful installation, please launch the program to get the main window. As the following image shows, there are 3 partitions without drive letter. Apart from the protected System Reserved partition (related to system recovery and affects the boot of Windows), the rest 2 either simply have no drive letter or they are hidden partitions. Under this situation, we know where the missing hard drive space is and we can assign drive letter to them or unhide partitions.
Case 3. There Is Unpartitioned Hard Disk Space
A newly bought hard disk cannot be used to save data unless we partition it. To be specific, we need to create partitions on the disk. Only partitioned space can be visible in Windows Explorer (a partition without drive letter is invisible in Windows Explorer, too), but we can see unpartitioned space (also called unallocated space) in both Disk Management and Partition Wizard.
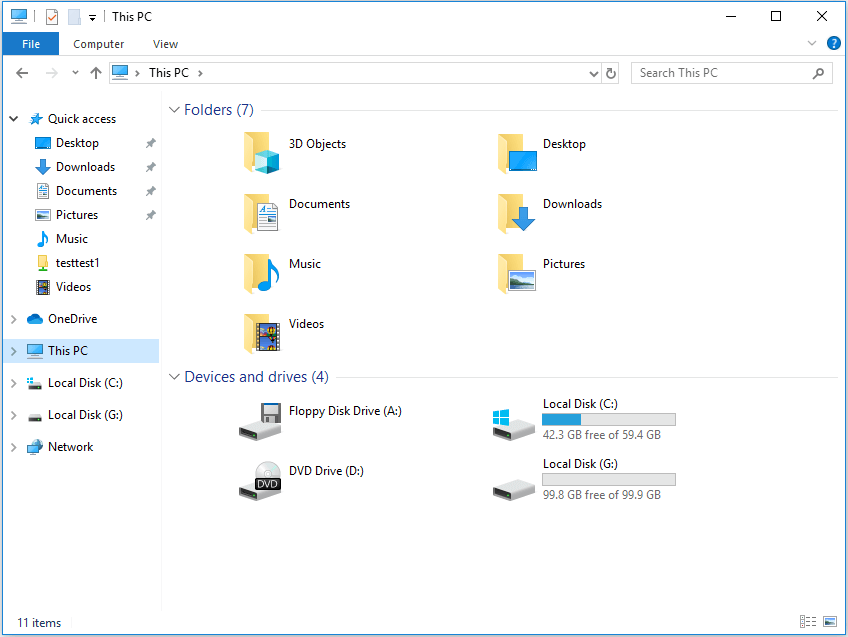
For example, there are 5 partitions and 2 unallocated spaces in my computer:

But I can see 2 partitions only (the System Reserved partition wont show up) in Windows Explorer:
To make use of unallocated space, we need to create partition(s) in it, which can be completed in Disk Management. Detailed steps: right click the unallocated space, choose “New Simple Volume“, set partition size, drive letter, file system, allocation unit size (cluster size), and volume label (optional) for the new partition, perform a quick format, and at last make all changes applied.
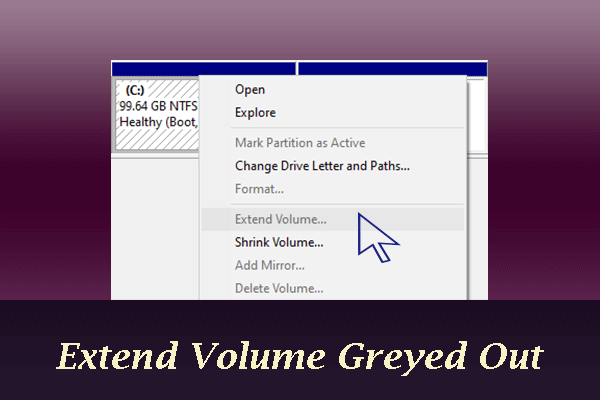
Of course, we can also extend an existing partition to the unallocated space. Since Windows Vista, the “Extend Volume” feature has been added to Windows snap-in Disk Management utility, but disappointingly it can only extend a partition to the right contiguous unallocated space. If the unallocated space is nonadjacent to the partition we want to enlarge or the partition is formatted with FAT, “Extend Volume” will be grayed out.
But fortunately there is partitioning tool that can extend a partition by taking free space from any unallocated space on the same disk without users converting to dynamic disk, and MiniTool Partition Wizard (freeware) is a good choice. Please see Extend Partition to get detailed steps.
In addition, if the unallocated space is generated due to deleting a partition, we can choose to recover the very partition rather than create new partition or extend partition. To do partition recovery, MiniTool Partition Wizard Pro is recommended.
Then, view the post Recover Unallocated Space to get detailed steps.
Case 4. System Protection Takes up Much Space
When checking properties of a certain partition (especially system partition), we may find its used space is much larger than the file size when we select all files in it:
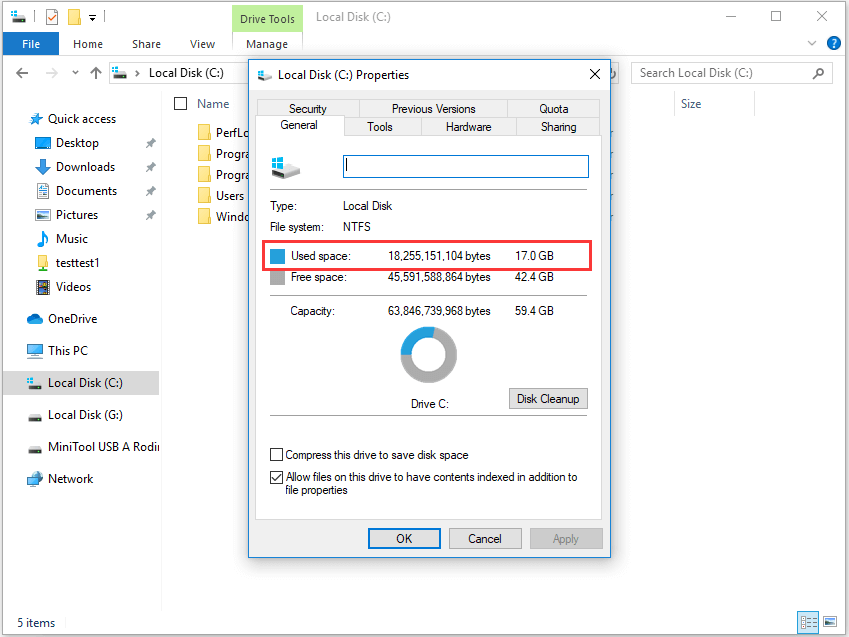
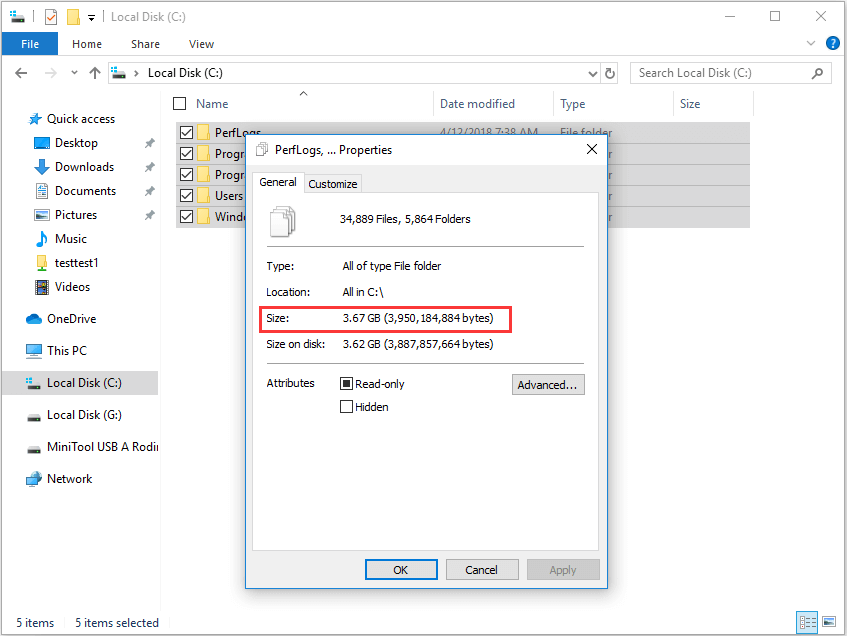
How does the difference occur? It may be allocated for system protection.
System protection is a feature that regularly creates and saves information about your computer’s system files and settings. It also saves previous versions of files that you’ve modified. All these files are saved in restore points, which are created just before significant system events, such as the installation of a program or device driver. Therefore, it is highly suggested that users turn on this feature, but sometimes it takes up so much space.
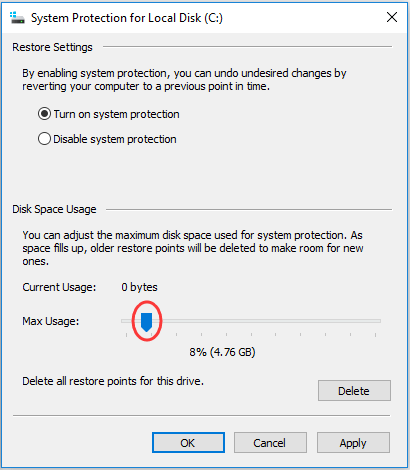
I have seen a computer which allocates more than 10GB space for system protection, but actually several GB is OK. At this time, we can decrease the space by modifying the maximum usage of system protection space.
Steps are as follows (take Windows 10 for example): right-click This PC, choose Properties, and then System Protection:
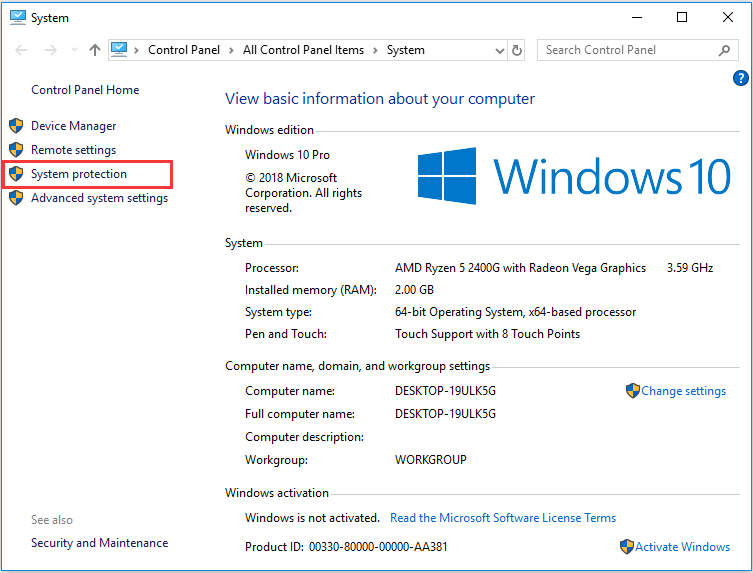
Next, select local disk (C:) under System Protection tab and click “Configure“.
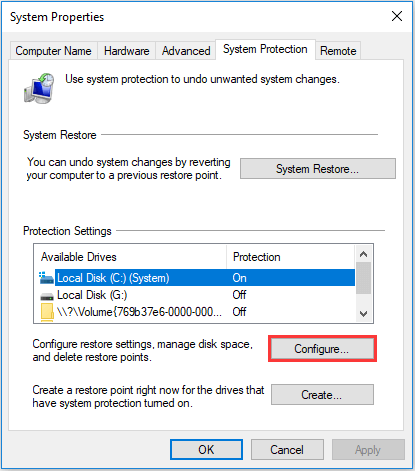
Now we can see the current space used for system protection is 4.76GB, but we can reduce it by changing the Max Usage to smaller size. Once the space reserved for system protection is used up, older restore points will be deleted automatically to save new ones. The smaller Max Usage is, the less space will be used for system protection.
Actually, apart from system restore points, hidden files will also make our hard drive space “missing” from hard disk. Let’s see the details.
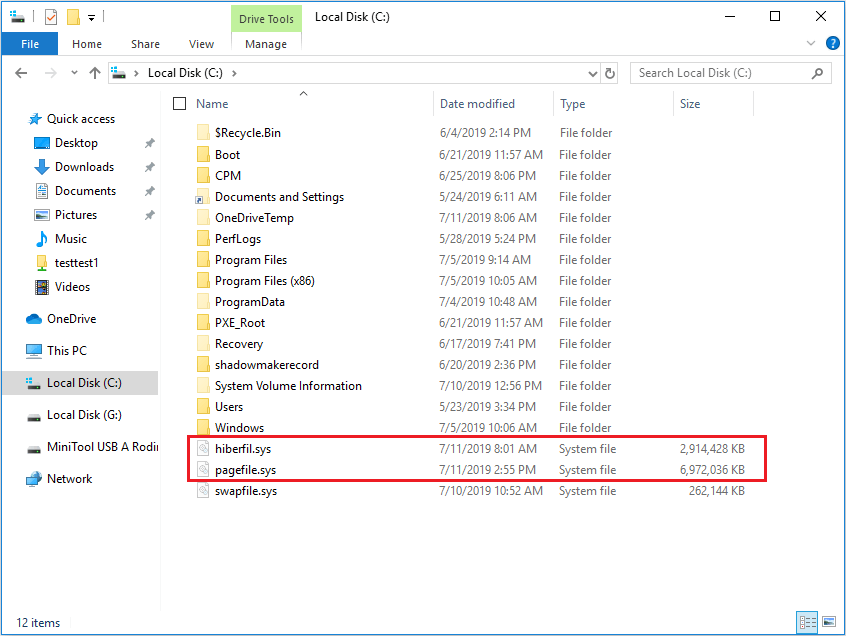
Case 5. Hibernate File or Page File May Take up a Lot of Space
Both hibernate file (hiberfil.sys) and page file (pagefile.sys) are hidden system files, and they are located in the root folder of the partition where operating system is installed. They are invisible by default unless we enter Folder Options and then uncheck “Hide protected operating system files“:
The hibernate file is reserved by Windows Kernel Power Manager when we install Windows. The size of this file is approximately equal to how much random access memory (RAM) is installed on the computer. In most systems, it is 75% of the total RAM by default. For example, if our computer has 4GB RAM, hibernate file will be 3GB. However, we are able to disable this feature or change the size of hibernate file to what percentage we want it to be.
If you do not want to hibernate system, turn it off like this: run command prompt as administrator, type powercfg.exe /hibernate off, and type exit to quit from the program.
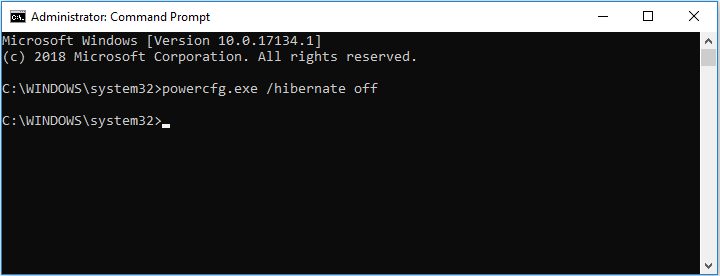
After that, the hiberfil.sys file will disappear from its original place. However, if you want to keep hibernate but hope it to be smaller, try this way: run Command Prompt as administrator, type powercfg-h-size 50% (can be any percentage), and type exit to quit.
Next, let’s see how page file takes up our disk space.
In general, our computer stores files, programs, and other data we’re using in our RAM, because it’s much faster to read from RAM than from hard drive. However, after all RAM is used up, Windows moves some of data from RAM back to hard drive and place them into page file. The size of page file is changeable, which depends on programs you are running and maximum size you set for page file. It is very necessary to enable page file if your RAM is not enough, because this can stop system crash or program failure from happening when RAM is used up.
However, some computers are set with too large page file, which is unreasonable and also space wasting. Under this situation, we had better decrease the space for page file or remove page file to save disk space. Detailed steps are as follows:
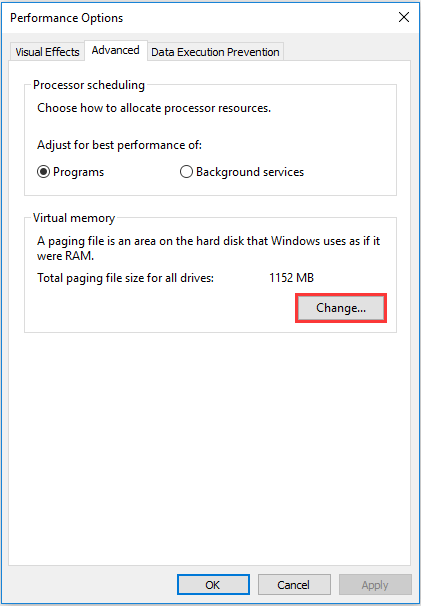
Follow this path: This PC -> Properties -> Advanced system settings. Then, choose “Settings…” of Performance under “Advanced” tab.
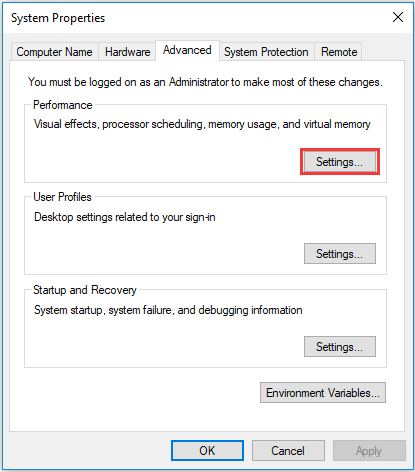
Next, tap on “Change…” button under “Advanced” tab.
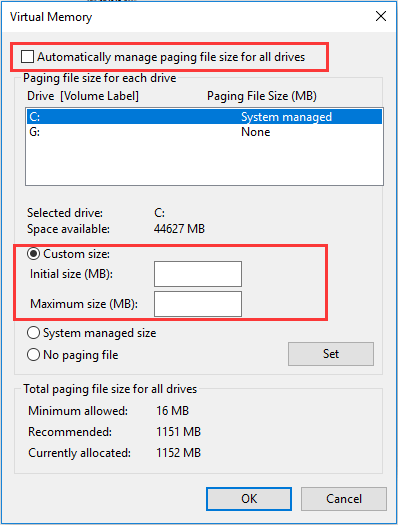
At last, uncheck “Automatically manage paging file size for all drives“ if it is checked, select the drive where page file is located, choose “Custom size“, and then type a new paging file size in megabytes in the Initial size (MB) or Maximum size (MB) box, and click “Set“. However, if your computer has enough RAM to keep smooth running, you can also disable page file by changing both initial size and maximum size to 0 MB or clicking “No paging file“.
After changing the size of hibernate file or page file, you may find several GB of disk space back, and this space can be used to save any other files. Next, let’s see the last possible factor which may make our hard drive space missing.
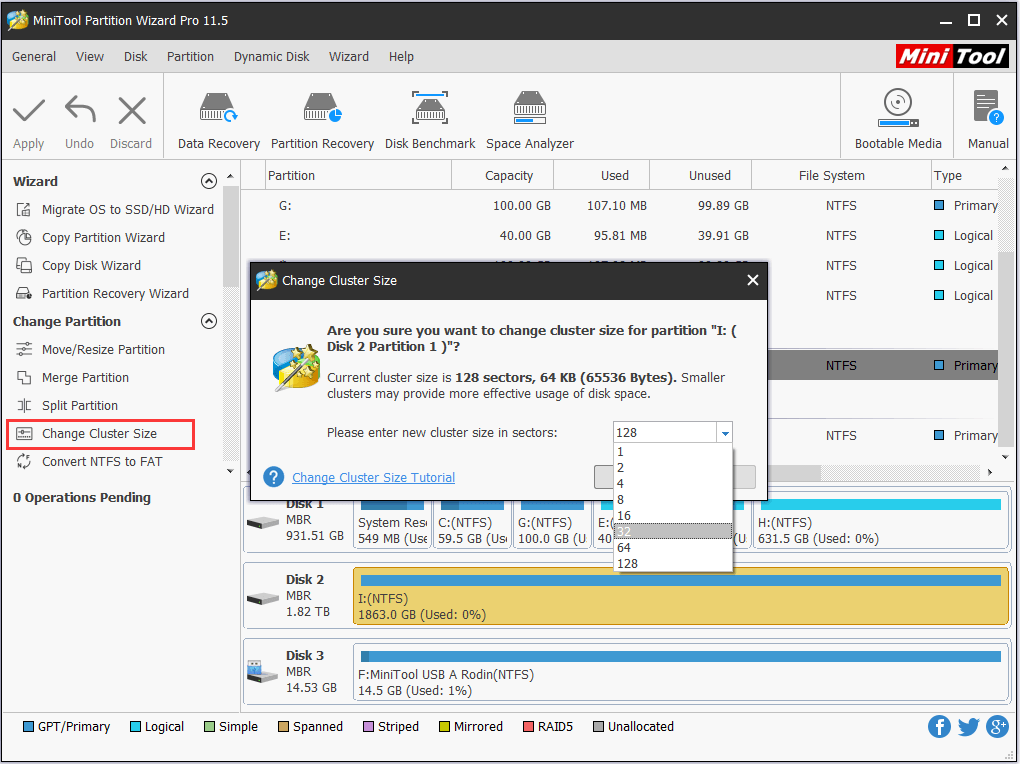
Case 6. Disk Space is Wasted due to Employing Unreasonable Cluster Size
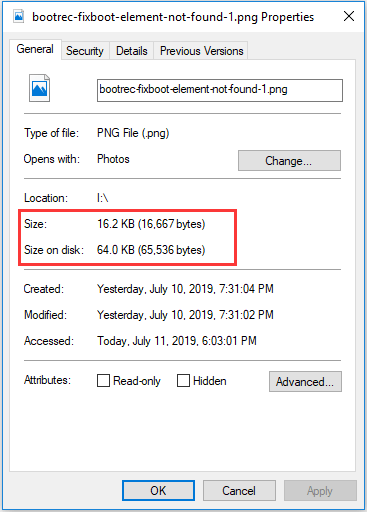
When we are viewing how much space our files are taking up, we may find a strange situation where real file size is 16 KB but these files occupy 64 KB space on the disk:
What’s the reason and where is the missing space? To answer these questions, we need to know something about cluster size, which is called allocation unit size by Windows.
We can say cluster is the smallest space unit for data storage and management, and cluster size is set when we are formatting a partition. One cluster can hold content of one file no matter how large the cluster is. For example, if we are saving a 100 bytes file to a partition whose cluster size is 4096 bytes, the 100 bytes file will take up 4096 bytes space, and the remaining 3996 bytes space cannot be used to save any other files; if we save a 4097 bytes file, it will take up 2 clusters, namely 8192 bytes space.
As a result, occupied disk space is always larger than real file size if this partition saves small files, but fortunately we have a good way to make them take up less space, and it is to decrease cluster size.
We have said cluster size is set when we are formatting a partition, so the first option here is to reformat the partition to decrease cluster size.
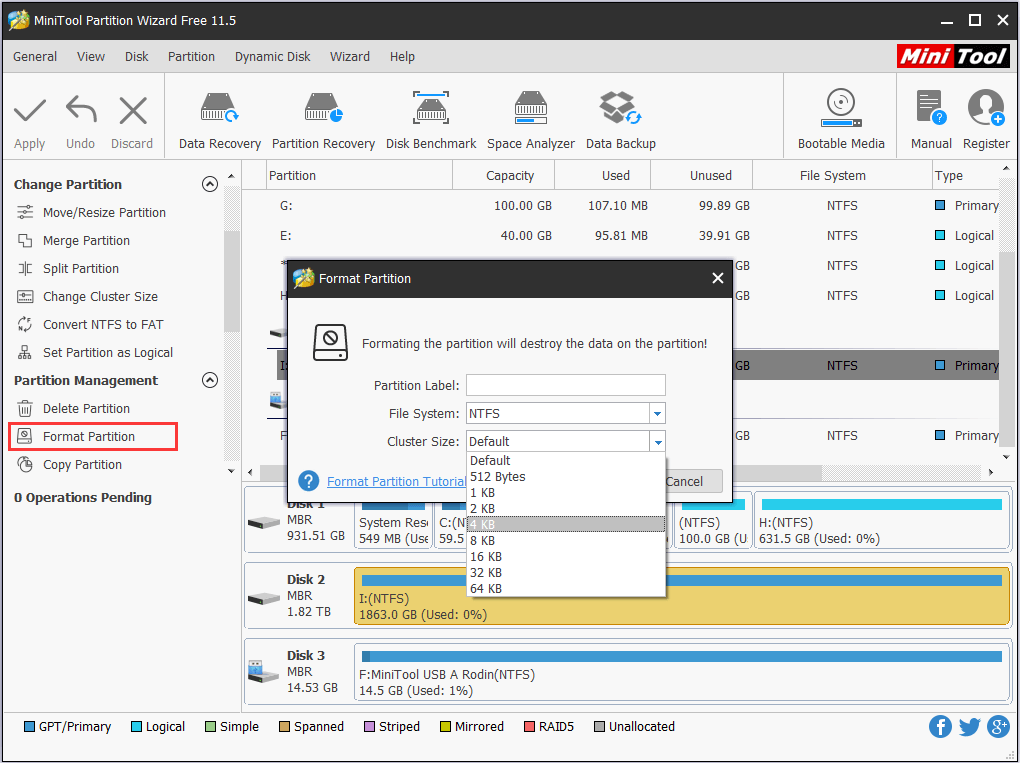
Steps are as follows: run MiniTool Partition Wizard Free, select the target partition and choose “Format Partition” feature to get the following window. Here, we can choose a new smaller cluster size for the selected partition, 512 bytes for example. Once the cluster size is set to 512 bytes, a 100 bytes file only takes up 512 bytes space rather than the original 4096 bytes disk space.
MiniTool Partition Wizard FreeClick to Download100%Clean & Safe
But what if you want to change cluster size without losing data? MiniTool Partition Wizard Pro could help you in this case. Now, download the demo version to see whether it works. If you are satisfied with the preview effect, you’ll need to purchase a license key.
MiniTool Partition Wizard DemoClick to Download100%Clean & Safe
Then, view the post Change Cluster Size to get detailed steps.
Is your hard drive space missing without knowing an exact reason? Now try taking one or some of these ways to find it. For any questions, welcome to leave us comments below or you can send an email to [email protected].
About The Author

Position: Columnist
Rodin is an enthusiastic IT writer focusing on Windows trends, disk partition management and data recovery. She loves to write and share her idea about the useful tips and tricks on personal computers' maintenance. If you are looking for methods to improve your computer performance, manage hard drives and recover data from different devices, Rodin can provide reliable solutions for data management.